
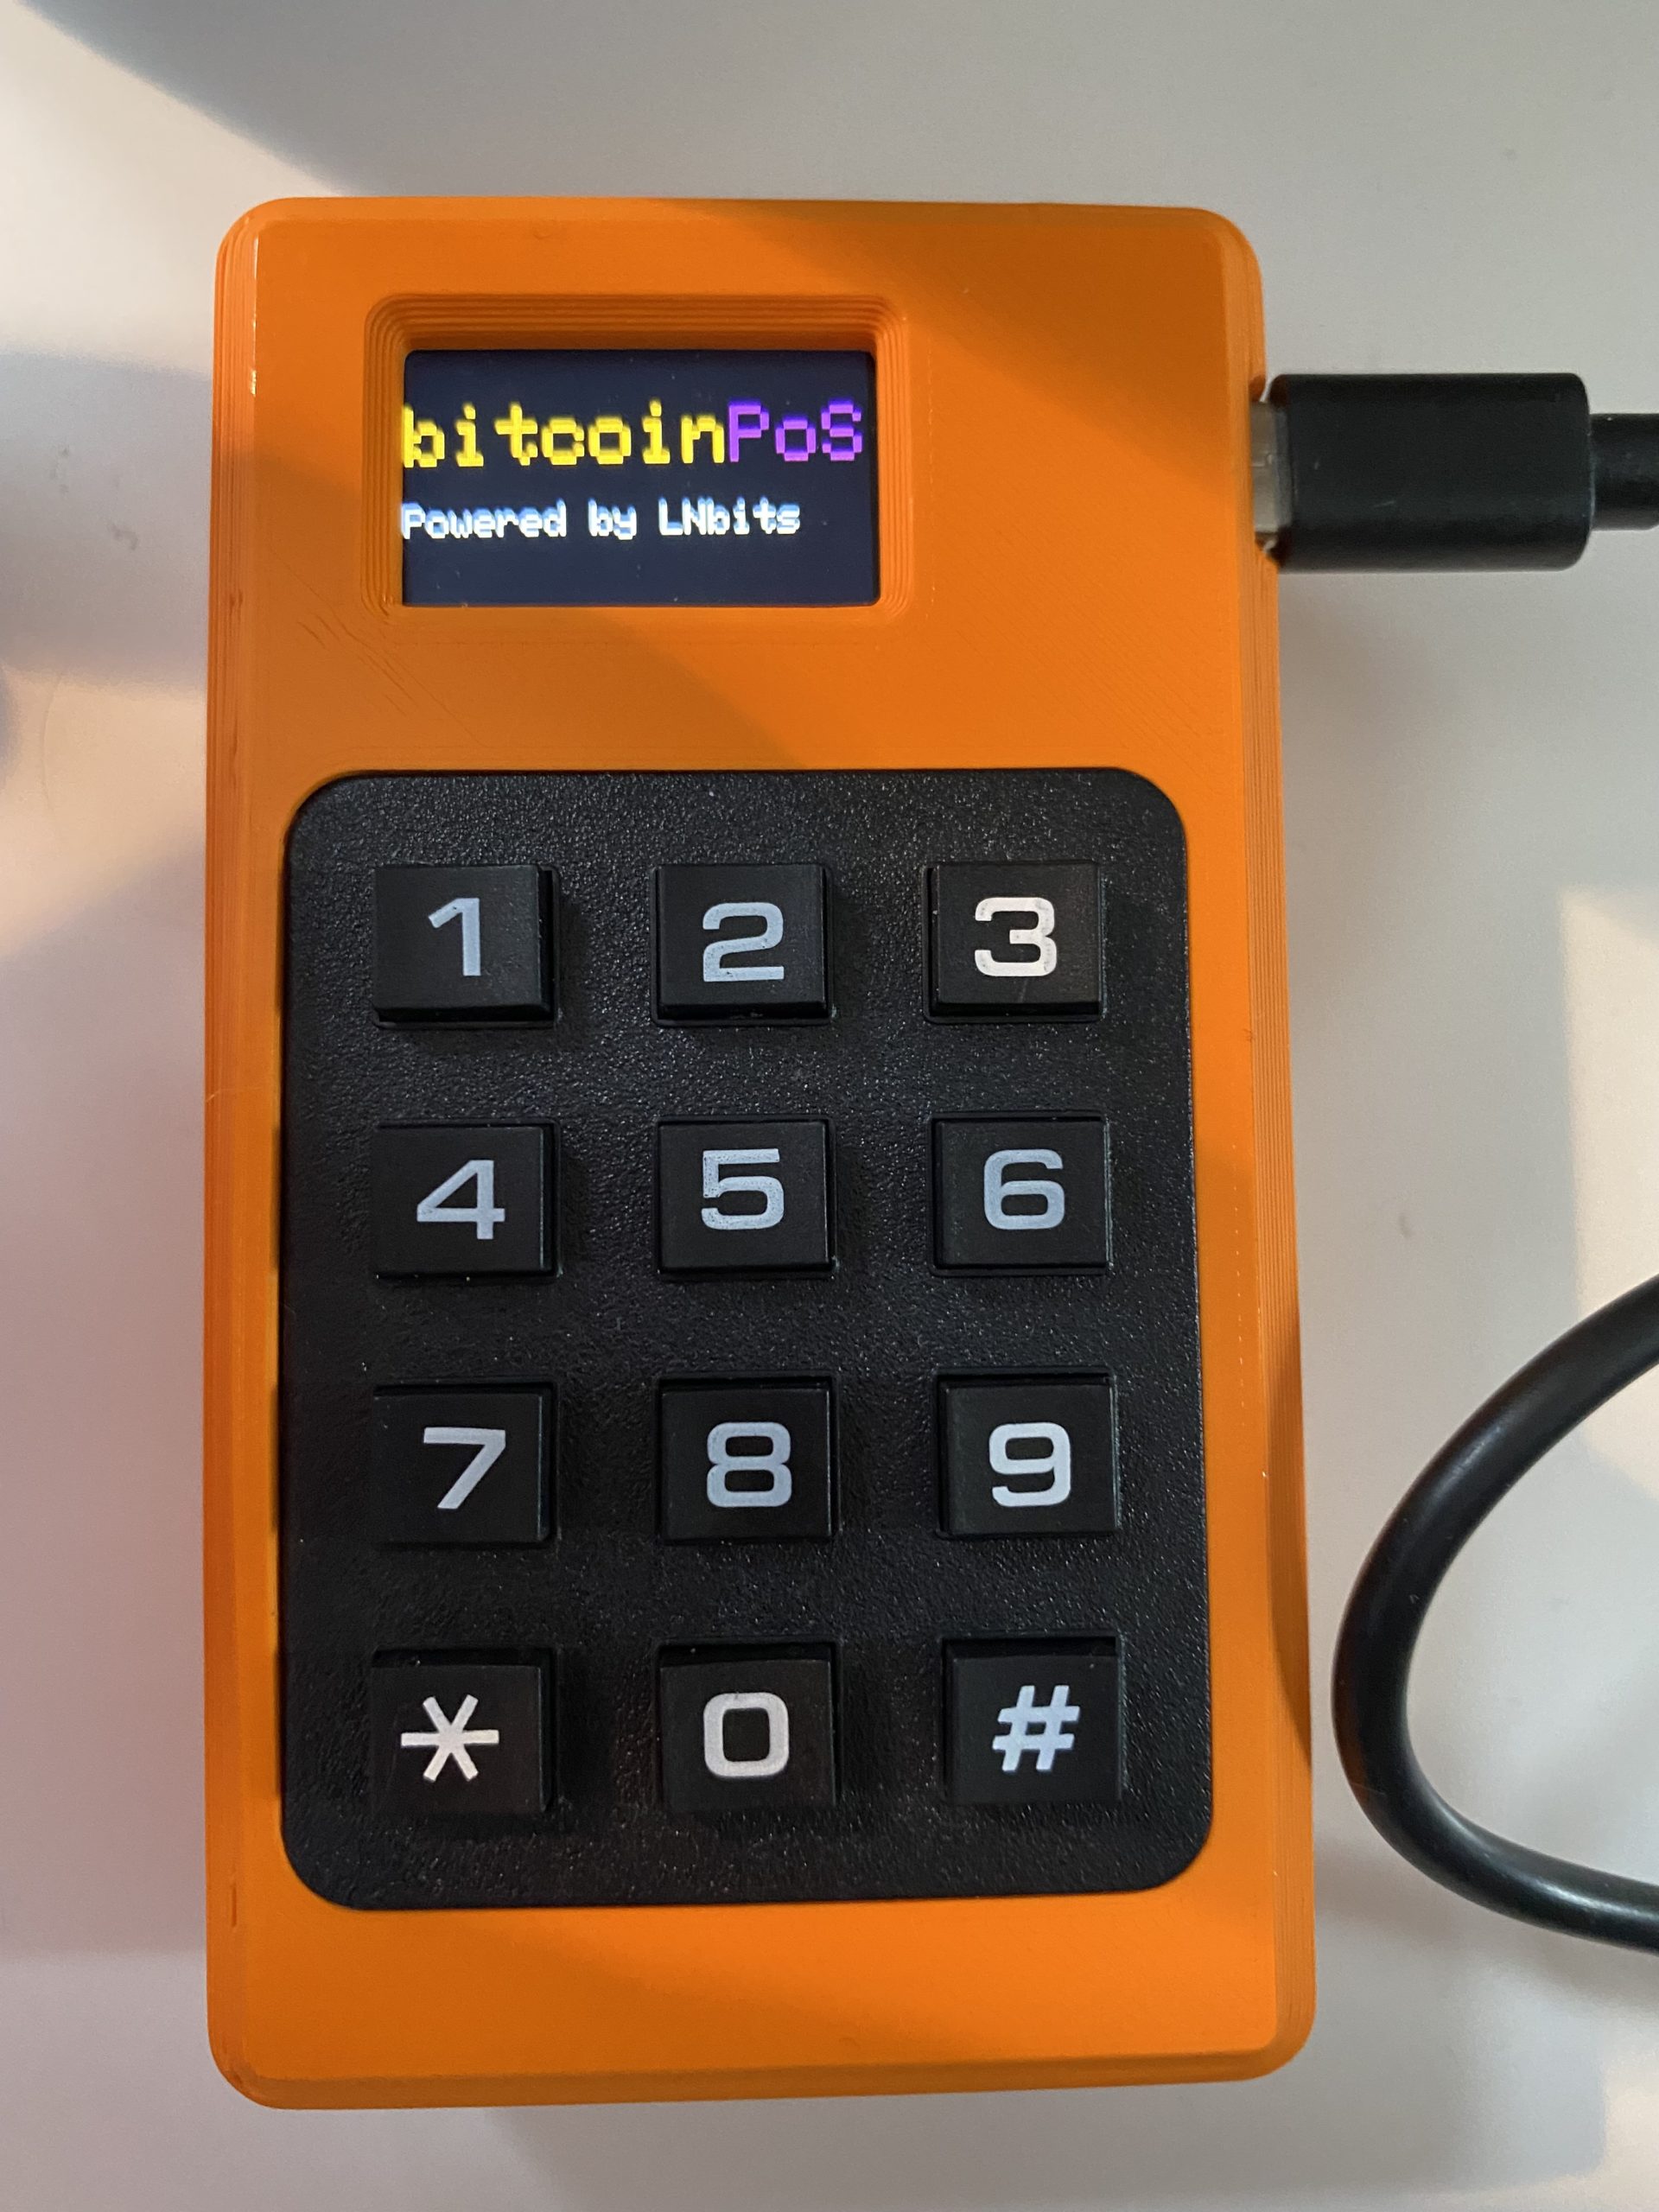
LNPoS – Lightning PoS Terminal
Accept Bitcoin in retail store via LNPoS (Lightning Point of Sale).
In this post we explain how you can accept Bitcoin and Lightning payments in your business (retail, restaurant, artisan, service provider) using a LNPoS hardware POS terminal.
With the LNPoS Bitcoin PoS Terminal, merchants can receive Bitcoin and Lightning payments and also sell Bitcoin just like at a Bitcoin ATM.
The LNPoS functions:
- LNURLPoS – for offline Lightning payments
- OnChain – for on-chain payments
- LNURLATM – for offline Lightning payments
The Bitcoin terminal can also be used offline. It can also be used in places where there is no internet connection, such as outdoor events, festivals or flea markets.
YouTube Video – Accept Bitcoin via LNPoS
On the Coincharge YouTube channel you can find a German language video titled “Bitcoin per LNPoS akzeptieren“.
The video explains how an LNPoS works, where to order the kit, and how to assemble and configure the LNPoS.
LNPoS hardware components
The LNPoS Bitcoin Terminal is not an app on a smartphone, but a standalone piece of hardware. The LNPoS consists of the following hardware components:
- Lilygo T-Display Keyboard Module as input field
- Lilygo TTGo T-Display ESP32
- Case
- USB cable
- Battery with Micro JST 1.25 connector (Optional)
- Slide switch (optional)
Optionally, a rechargeable battery and an on/off switch can still be purchased.
These individual parts can be ordered separately and individually.
But there are also suppliers like Fulmo and Anchorhodl where you can order a complete kit.
We bought our LNPoS from Fulmo. The kit cost about €50,- (at block time 762388) and for €10,- more, you could get the necessary software already preinstalled.

The kit consists of the Lilygo T-Display Keyboard Module and a case created with a 3D printer.
The LNPoS receives its power supply by connecting to a computer via the supplied USB cable.
For a use in the store or in a restaurant, independence from this USB cable is recommended.
Perhaps Fulmo will add a rechargeable battery to its complete set (a link refers to an offer on Amazon) and an on/off switch.
This is not mandatory and can be retrofitted later if required. We have chosen the LNPoS – Construction Kit with pre-installed software for €59,- and now explain how to assemble the hardware.

With a 3D printer, you can create your own custom case.
For us, Lightning Bits has provided a couple of cases.
Assembling the LNPoS Lightning PoS Terminal
The LNPoS Construction Kit from Fulmo is supplied as shown in the picture opposite.


We also got ourselves a rechargeable battery and had the necessary tools (a small Phillips screwdriver and pliers) ready.
We take the keyboard module (here: LILYGO® TTGO T-Display ESP32 Keyboard For LNURLPoS Keypad Module) and disassemble it first.


We remove the protective sticker from the display and pull the display out of the connector.
If we use a rechargeable battery (accumulator), then we plug it into the provided connector on the back of the display. If we do not want to use a battery, we simply do without it.
We recommend to wait for the installation of the battery until we have deposited the software and own data. For the configuration it is necessary that our LNPoS is removed from the power. This is easier if we wait to install the battery.


Then we remove the four screws and separate the rest of the keyboard module. Now our screwdriver comes into play. To prevent the screws from spinning, we use the pliers to hold the screws appropriately.
Once we have removed all the screws and separated the keypad, we turn our attention to the case.

LNPoS Case

The LNPoS case comes from a 3D printer. Accordingly, there are still a few plastic parts that need to be removed.
On the side there are still six small rods, which we can break away with the screwdriver.
Now we have the necessary space to press the keypad element with the input keyboard into the housing.


Then we put the element with the display into the housing.
Then the remaining part from the keypad to the appropriate connectors.
Then we put the second part of the housing on it and screw the whole thing.
We may need to pre-drill the holes provided for the screws and also press them slightly when inserting them into the case.


This completes the assembly of the LNPoS. When the LNPoS is connected to a power source for the first time, either via the battery or via the USB cable, the display becomes active and shows No Methods and Restart & Run Portal.
After we have prepared the hardware, we need the data from our Lightning or Bitcoin wallet, which will later be deposited on the LNPoS.
It is advisable to have a text file ready in which we can save the information obtained, as this data will be needed in a later step.
LNbits account
To receive Lightning payments, we need an account with LNbits
The LNPoS hardware interacts with LNbits to receive the incoming Bitcoin and Lightning payments.
This requires a wallet at LNbits. You can find a detailed description of LNbits here: LNbits Lightning Wallet and Account System
We can set up LNbits on our own server. How this can be done is explained here: https://github.com/lnbits/lnbits-legend
Likewise, LNbits is pre-installed on some hardware nodes. For example, if you have a Raspiblitz or Umbrel running, you can use your own LNbits.
The setup is somewhat complicated in these cases, as the hardware nodes are usually operated in the user’s own home network and access for external users must be allowed via the Internet.
How to use LNbits on your own Raspiblitz you can find out here: https://coincharge.io/lnbits/#raspiblitz
However, LNbits also operates its own server, which can be shared.
You get to the site via the homepage https://lnbits.com/and then you switch to the Legend server.
The direct url is: https://legend.lnbits.com/ and there you create your own wallet.

LNbits Wallet

The first step is to create an LNbits wallet. In our example, we create an LNbits wallet directly on the LNbits server at: https://legend.lnbits.com/
We choose the name Coincharge for ourselves and click Add a new Wallet.
We do not require any email address or other login data. After we create the wallet, we should bookmark the url with our wallet details so that we can access the wallet directly at a later time.
After we create the wallet, in the right pane there is the API info about the wallet. We unfold this area and get the Invoice/read key displayed.

We can copy this information into a separate text file, because we will need this information later.
LNbits Extension LNURLDevice
In the left menu bar there is the menu item Extension and Manage Extension. We click on Manage Extension and get a variety of applications listed which can be used with LNbits.

We select the LNURLDevice extension and click Enable.
After that LNURLDevice will be listed in the left menu bar. We open the extension and set up POS and ATM.
LNURLPoS Function
We click on New LNURLDevice Instance and a new window opens.
We give the PoS function a title of our own choosing.
Then we need to select a wallet from the dropdown menu. You can create multiple LNbits Wallet. Since we have created only one wallet, the selection results accordingly.
We would like to accept payments based on Euro and choose EUR accordingly.
Then we select PoS because we want to use it as a point of sale.
In the Profit Margin field we can set a percentage markup on the conversion rate. Since we are not interested in exchange rate gains, we set the value to 0 and click Create LNURLDevice.


We get a listing of already created LNURLDevice and click on the icon next to the title we created.
Another window will open with the LNURLDevice device string.
We click on it and copy the content and paste it into our text file.
LNURLATM Function
In addition to accepting payments via the PoS function, LNPoS also has an ATM function.
With the ATM function you can sell Bitcoin.
For example, a customer wants to buy the equivalent of €50,- Bitcoin. He gives the seller the amount in cash, for example. After that, the seller enters the amount of €50 via the ATM function and via the displayed QR code, the buyer can transfer the Sats to his Lightning Wallet.
Since we as sellers also want to earn something, we will add a 5% markup to the price.
We create a New LNURLDevice instance again. We again select a title and set the currency.
Now we select ATM and in the Profit Margin field we enter 5 to achieve a margin of 5%.

Again, we click on the icon in the overview to get the LNURLdevice string for the ATM function.
We also copy this information into our text file.
OnChain – for on-chain payments
So far, we have dealt exclusively with Lightning payments. But we would also like to receive bitcoin payments, on-chain payments, with our LNPoS.
For this we need an Xpub key. You can use an xPub key from your hardware wallet.
We have explained the topic xPub Key in detail in the article: Determining xPub Key. Here you can also find the information on how to get the xPub key from your own hardware wallet.
f you don’t use your own hardware wallet, you can also use BlueWallet and use the xPub key. In the YouTube video we used the xPub key from BlueWallet. You can jump to the appropriate place in the video or read it under BlueWallet xPub Key
After we have determined or created the xPub key, we can start configuring the LNPoS.
Install LNbits software on the LNPoS
Install software on the LNPoS
To install the LNbits software on our LNPoS, we go to the website:
https://lnbits.github.io/lnpos/installer/index.html
We connect our LNPoS to our computer using the cable provided.
After that we select “Stable Version” and click Flash.
The LNbits-Github page tries to connect to the serial port where LNPoS is connected.
Allow this accordingly and then the installation of the LNbit software on the LNPoS begins.
After installing the necessary software to use the keypad hardware as an LNPoS, we now need to make the individual settings so that the incoming sats are credited to our own Bitcoin or Lightning wallet.
LNPoS WLAN connection
To access the settings for the LNDPoS options, we need to access the LNDPoS via the WLAN function.
Our LNDPoS has a WLAN function and a WLAN connection can be established via it.
We remove the cable from ours and thus our LNPoS has no power source. We press any key, hold the key down and reconnect our LNPoS to a power source.
AP Launching is then shown in the display during startup.
This means that our LNPoS is in the process of searching for an AP (=Access Point).

Now we need our smartphone or computer with its own Wi-Fi function. To do this, we go to the WLAN settings and search for a WLAN network in the vicinity, which has the designation LNPoS.
Select the WLAN that starts with LNPoS.
If the LNPoS WLAN network could be selected, one reaches the LNDPoS options.
LNDPoS PoS settings
Before you can access the LNDpoS options, you will be asked for a password. The password ToTheMoon1 has been preset by LNDPoS in the factory.
After entering this password, you will get to the LNDPoS settings.
The technical LNPoS settings are then displayed. Under SoftAP IP, for example, an IP address is displayed. When I type those into my browser, I also get to the LNDPoS settings and can set them up a little more comfortably.

PoS Options
In the PoS Option menu item we can now make the individual settings. We have already compiled the necessary data in the text file. We will deposit this data at this point.

The first field is the password field for accessing the LNPoS backend. The default password is ToTheMoon1 and can be changed at this point.
In the Master Public Key field we enter the xPub key from our onchain Bitcoin wallet. This is required to receive bitcoin-only payments.
In the LNbits Server field we enter the url of our LNbits server. If we use the server provided by LNbits, then the input is https://legend.lnbits.com/
If we use our own LNbits server, then we enter this url accordingly.
In the Wallet Invoice Key field, we enter the Invoice/Read Key that we received when we created the LNbits wallet.
Then the currency of our country, in this case EUR for Euro.
The LNURLPoS string field contains the data from the LNbits extension LNURLDevice. Here are the specifications from POS.
In the field LNURLATM string the data for ATM.
Then the specifications for the Mempool.Space. No changes are recommended here.
In the LNURLATM pin string field the default value is 878787. This pin is required if withdrawals are to be made.
Here you can set your own PIN.
After that we click on Save and a new page is displayed with the changes made.
Then the time has come to try out our LNPoS to see if everything works the way we want it to.
Using LNPoS

While we are making our settings, the display of the LNPoS AP shows Launched When finished reset.
We need to remove the LNPoS from the power source again and thus achieve a reset.
After we reconnect the LNPoS to a power source, the display bitcoinPoS powered by LNbits appears.


After a few seconds the selection menu will be displayed.
We can see the four menu items:
- LNURLPoS
- OnChain
- LNURLATM
By pressing * we can change the selection. By pressing # we get to the detailed view.
LNURLPoS
LNURLPoS is intended for payment by Lightning. The fiat amount to be paid is entered.

After the amount is entered, press # and the QR code for the Lightning bill will be displayed.

This QR code can be scanned by the payer using his Lightning Wallet.
In our case, we used the Wallet of Satoshi Lightning wallet.


After a successful payment, the payer receives a notice that the payment was successful.
When the payer clicks on Open Url, he is shown a four-digit code.
When the merchant (payee) presses the # button, he also gets a four-digit code displayed.
If both codes are identical, then the payment was successful and is completed.

OnChain

If a customer wants to pay by Bitcoin, i.e. OnChain, then this option is selected.
The display shows xPub Ending.
To create a Bitcoin address based on this xPub key, we click # and again a QR code is displayed.
The payer can scan to this QR code and specify the amount to be paid. On the part of LNPoS, the amount is not entered beforehand or a purpose is defined, as was the case with the Lightning payment under LNURLPoS.
There is also no PIN code displayed, which can be used to check a successful payment.
Whether a payment has been successfully completed can be checked as follows:
The trader can log into his Bitcoin wallet and check if the payment is on its way or has already been credited.
The merchant can press the # button after the payment. He will then receive a different QR code. He can scan this QR code with any other QR code reader and will get an url pointing to Mempool.Space website.
The detailed information about the onchain bitcoin transaction can be accessed via it. The trader sees that the transaction is in the mempool or the number of confirmations already completed.
LNURLATM
In the ATM version, an amount is debited from the merchant’s Lightning Wallet.
After entering the LNURLATM menu item, the trader must enter a PIN code. The default PIN code is 878787.
In the LNPoS settings we could change this PIN code.


After the PIN code is entered, the merchant can enter the amount to be paid out.
In this case, the customer wants to purchase Lightning in the equivalent of €1. After the merchant receives the purchase amount, the merchant generates the QR code.
The buyer can then use a Lightning Wallet that supports LNURL Withdraw to retrieve this amount.
The buyer will see the successful completion of this process in his Lightning Wallet.
The seller does not get any feedback. Again, feedback to the dealer would be desirable, as is the case with LNURLPoS.
However, the merchant has the ability to log into their LNbits account and view the corresponding Lightning transactions.

We had already recommended a corresponding bookmark of this url at the beginning of the text.
Summary
The LNPoS is a very good option for brick-and-mortar merchants who want to accept Lightning payments on site. The standalone hardware can be used by any employee to receive Lightning payments. Lightning payments are credited to the standalone LNbits wallet, which can then only be accessed by the boss.
The LNPoS hardware terminal thus offers an interesting alternative for Lightning PoS solutions that can be operated as an APP solution on a smartphone.
This means that employees can also accept Lightning payments when the boss is not on site with his smartphone.
It is somewhat unfortunate that there is no feedback to the merchant for OnChain payments and for the ATM function. This must be checked in a somewhat roundabout way and may be a bit cumbersome for the untrained layman. Hopefully, there may be a more user-friendly version in the future.
If you put your focus on accepting Lightning payment, then you have a perfect solution.
LNPoS is perfect for convincing your favorite restaurant, pub or Meetup location to accept Lightning payments.
Bitcoiners from German-speaking countries can create an LNPoS for a business and create a video of the Lightning payment.
If the video is published on Coinpages, you will receive 100,000 sats as a reward.
Thus, you can finance the LNPoS, pay with Lightning yourself in your favorite pub and at the same time contribute to the spread of Lightning as a payment method.