Use xPub Key from Raspiblitz with external BTCPay Server
In this post, we describe how you can receive Bitcoin (OnChain) and Lightning (Off-Chain) payments on your own Raspiblitz when using an external BTCPay server.
If you want to accept Bitcoin payments on the Internet, you have to make sure that the BTCPay server can be accessed by customers via the Internet at any time.
There is also a dedicated BTCPay server on the Raspiblitz. If you operate your Raspiblitz in your own network, it may be undesirable for security reasons that an uncontrolled access from the Internet is possible.
However, access would be required if end customers want to pay with Bitcoin in their own online store and this payment processing is to be carried out via the BTCPay server.
Therefore, it is recommended that an external BTCPay server is used for Bitcoin payment processing and not the BTCPay server on your own Raspiblitz in your own network.
The crediting of Bitcoin and Lightning payments, on the other hand, is to take place directly on the company’s own Raspiblitz.
We describe how you can use an external BTCPay server and get the credit directly on your Raspiblitz.
The first section describes how to get the xPub key from your Raspiblitz to receive Bitcoin payments. xPub Key for the Raspiblitz
In the second section we explain how to create the BTCPay connection string on your Raspiblitz and how to store it as “Use Custom Node” on the external BTCPay server. Connect Raspiblitz Lightning Node with BTCPay Server
Table of contents
xPub Key for the Raspiblitz
What is xPub Key?
To receive Bitcoin payments, a separate and unique Bitcoin address must be created for each payment. This Bitcoin address is a public address, because this address can be communicated to everyone. In order for this infinite number of public Bitcoin addresses to be created automatically, an Extended Public Address, or xPub for short, is required.
This public xPub address is obtained from your private address. This private address is your 12 or 24 words, which you must never share with anyone. While you need the xPub Key to receive payments, your Private Address is required to send payments. Whoever knows your private address can dispose of your Bitcoin and send it.
Therefore, you should NEVERtell anyone your private key or post it on any website.
In this tutorial, we will describe how to do just that in order to get the xPub key from your private key (xPrv for short).
Basically, we recommend using the xPub Key from a hardware wallet.
How to use the xPub key from a hardware wallet, you will learn in the article: “Determine the xPub key of a hardware wallet“.
If you are aware of this risk, then you will learn how to proceed and get the highest possible safety.
This guide draws on the content of Openoms’ contribution.
Du findest den Original Betrag in englischer Sprache hier: https://openoms.gitbook.io/lightning-node-management/technicals/restorelndonchainfundsinelectrum
And as a German translation of BTC21 here: https://btc21.de/lightning-node-retten/
Abstract of the procedure
Our goal is to determine the xPub key that we want to deposit with the BTCPay server. To determine the xPub Key Extended Public Key), the xPrv Key (Extended Private Key) must be determined beforehand.
We determine the xPrv again from the 12 or 24 words (Mnemonic).
In order to prevent information from falling into unauthorized hands during the collection of this data, we will make copies of the required web pages and disable our Internet connection.
Creation of the xPrv Key
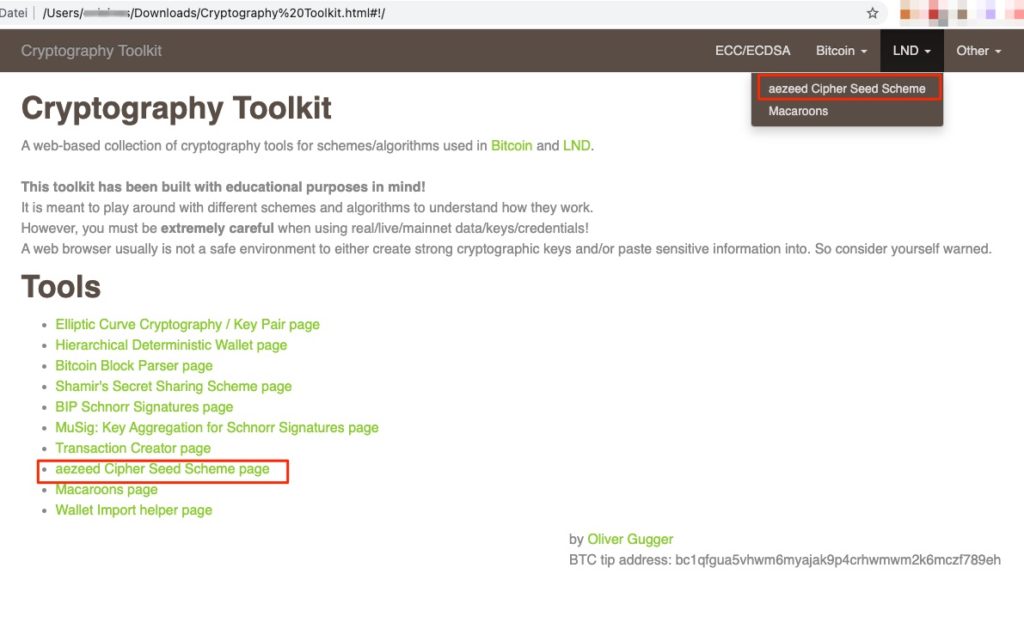
To determine the xPrv key from our mnemonic words, we go to the website:
https://guggero.github.io/cryptography-toolkit/#!/aezeed
We create a copy of this web page by right-clicking on the page and saving it locally on our computer.
After we disable the Internet connection, we open the created copy which is named Cryptograpy-toolkit.html.
We open aezeed Cipher Seed Scheme because the Raspiblitz uses an LND node, which in turn uses the aezeed seed format.
After we select aezeed Cipher Seed Scheme, the following page appears:
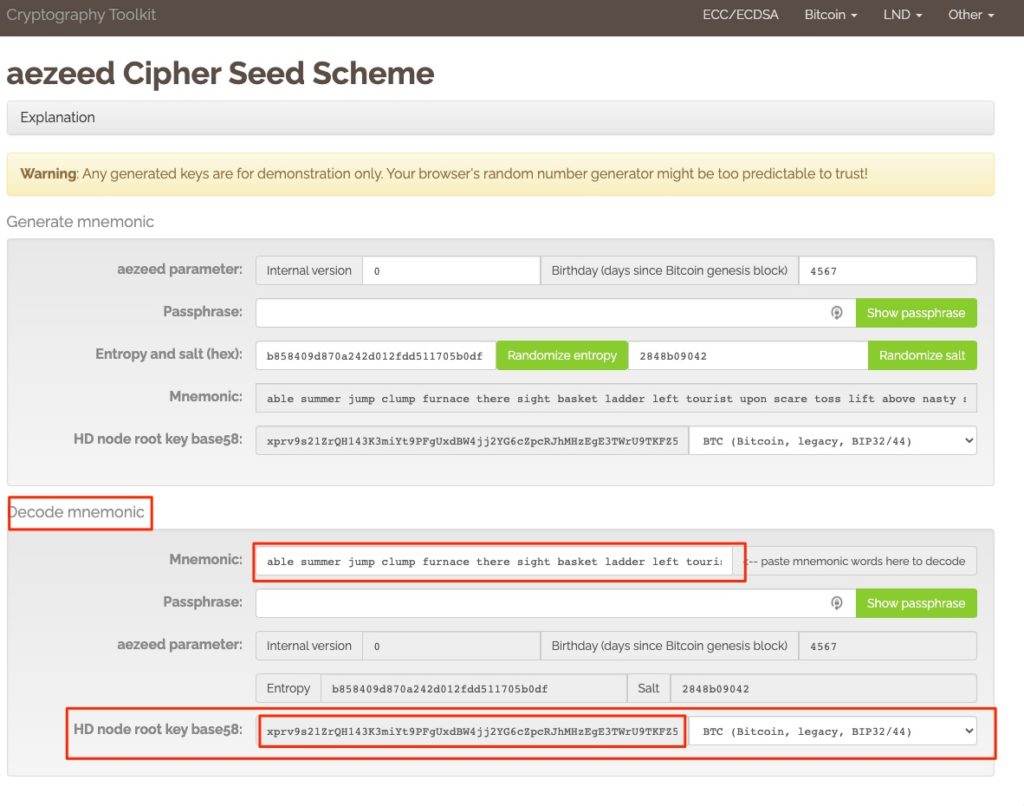
Here we go to the Decode mnemonic section to determine the Private Key from the seed words (Mnemonic).
Here we go to the Decode mnemonic section to determine the Private Key from the seed words (Mnemonic).
Then we enter our 24 words in the Mnemonic field.
Our xPrv key is then displayed in the HD node root key base58 field.
We copy this xPrv key to get the xPub key on another page.
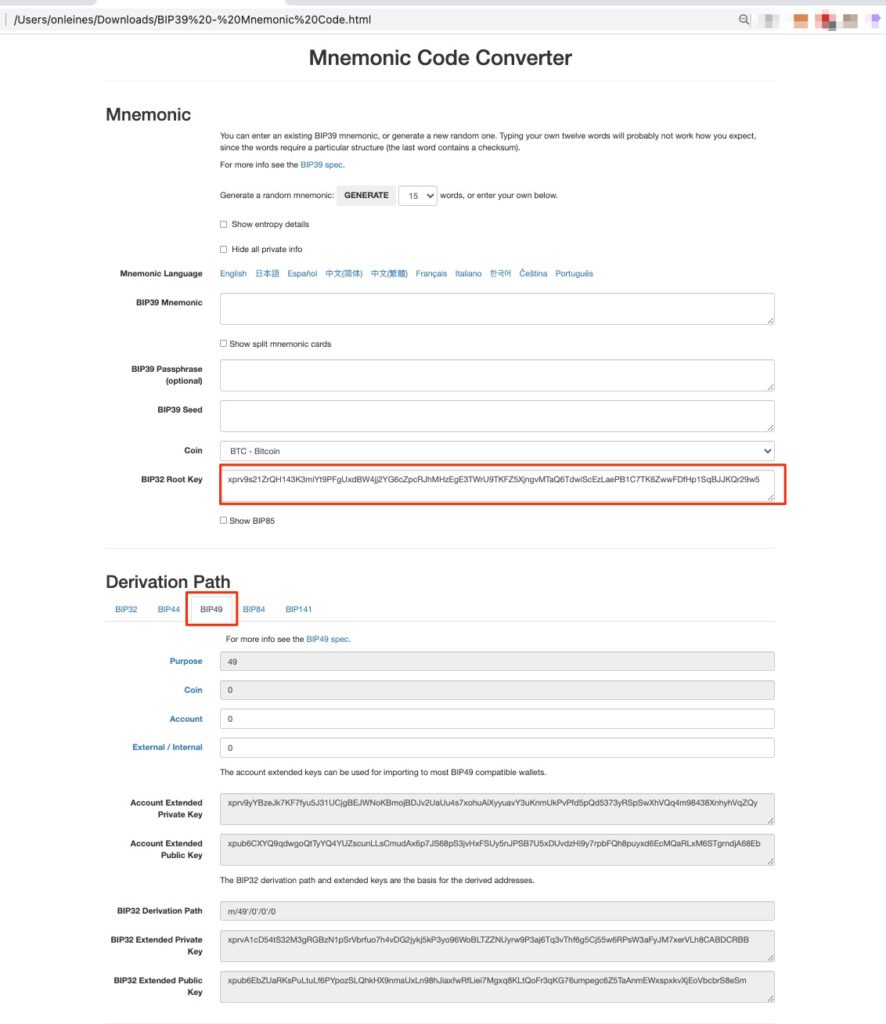
Mnemonic code converter
To do this, we go to the website https://iancoleman.io/bip39/ and also create a local copy of this page and open this copy after we disconnect from the Internet.
In the BIP32 Root Key field we enter the HD node root key base58 data.
In the Derivation Path section we specify which data format we want to use. We recommend BIP49 for legacy addresses because this format is supported by most Bitcoin wallets and thus most customers can use it to pay us.
In the Account Extended Public Key field we then get our xPub key displayed.
Deposit xPub Key with BTCPay Server
We can now deposit the generated xPub key on the external BTCpay server. To do this, we go to the General Settings in our BTCPay Store and select the BTC Wallet under Wallets.
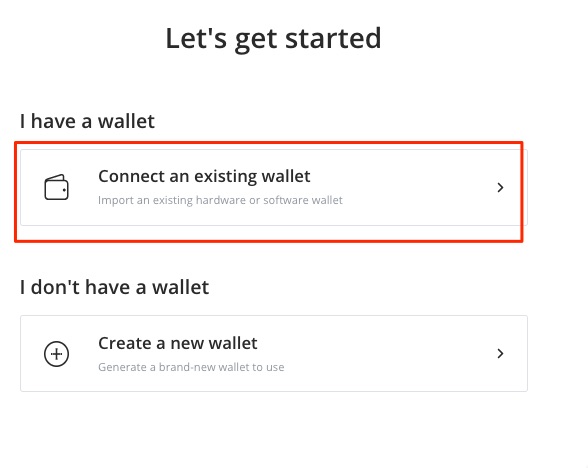
A prompt will appear asking if we want to connect to an external wallet or create a new Bitcoin wallet on the BTCPay server.
Since we want to use our Bitcoin wallet from our Raspiblitz, we select the option “Connect to existing wallet”.
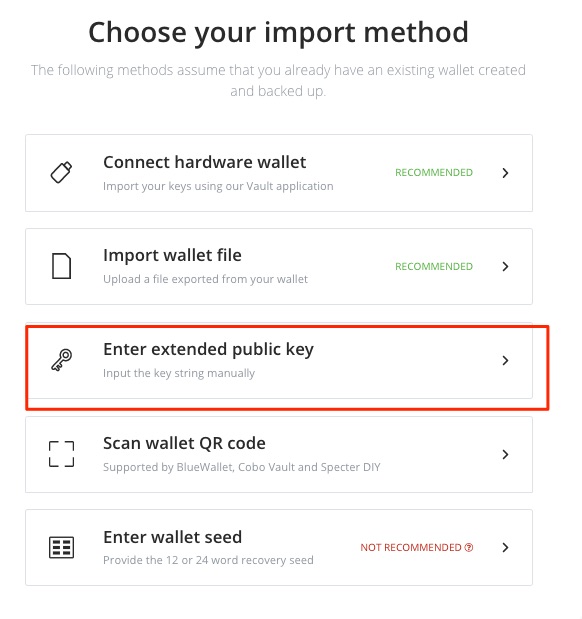
After that we choose how we want to connect the external wallet.
We decide for “Enter extended public key”.
Now we enter the generated xPub key. Additionally we add the suffix -[p2sh] to the end of our xPub key.
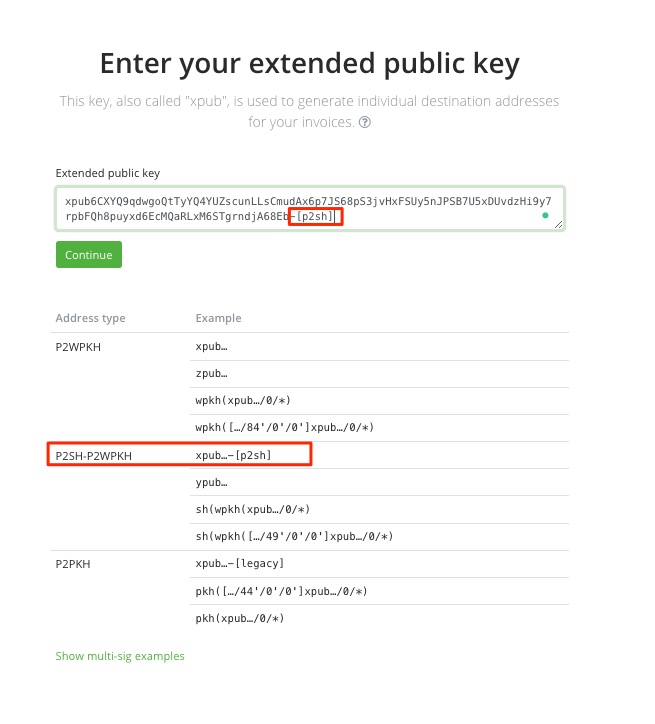
After that, the first Bitcoin addresses are generated from our stored xPub key, which will be displayed to the respective customers for future Bitcoin payments.
The credit of these Bitcoin, which are sent to this Bitcoin address, will thus directly become your Bitcoin balance on your Raspiblitz.
Use own Lightning Node with BTCPay Server
In the case of an external BTCPay server, it is possible to store your own Lightning Node.
To do this, start the setup process in the General Settings of the BTCPay store.
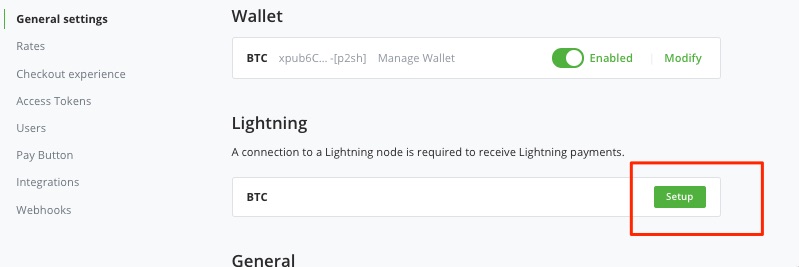
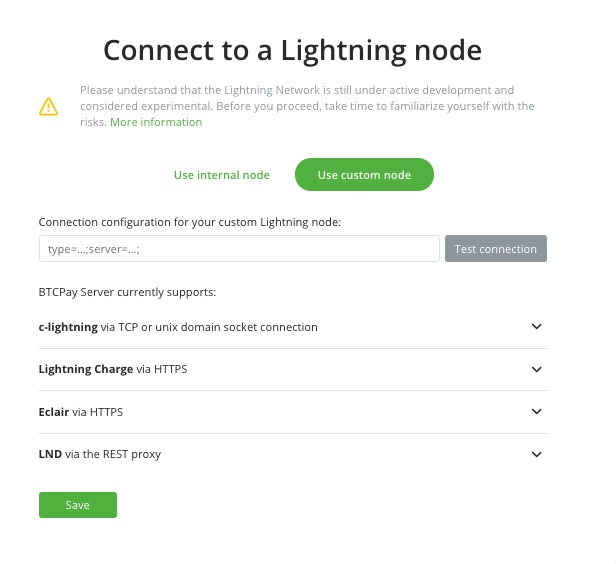
You have the option to use the internal Lightning Node or an external Lightning Node. To use your own Lightning Node on a Raspi flash, use the option “Use custom node”.
We receive the data, which must be deposited here, from Raspiblitz.
To do this, we switch to the menu of our Raspiblitz and select the menu item Additional Services.
Within Additional Services there is the item ChannelTools (Fund Rescue) which we activate and confirm with ok.
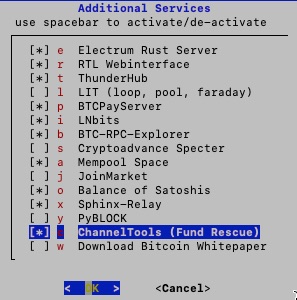
The ChannelTools service is installed and set up on our Raspiblitz.
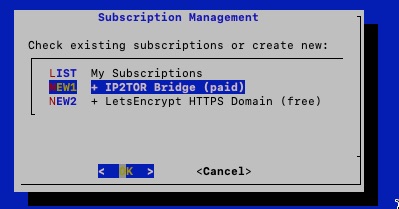
After that we switch to the Subscription Management section in the Raspiblitz menu and order the IP2Tor Bridge Service.
Then we are asked which bridge service should be booked and we choose LND Rest API
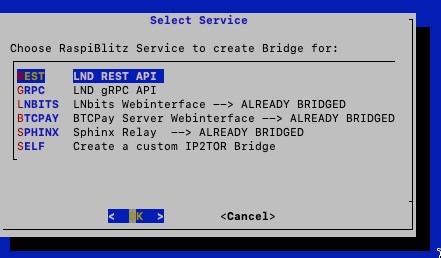

The window shown opposite will then appear.
No changes are made here, but simply confirmed with OK.
We order the IP2TOR service at the indicated conditions
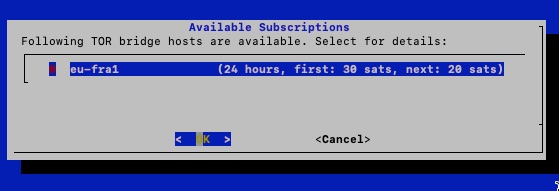
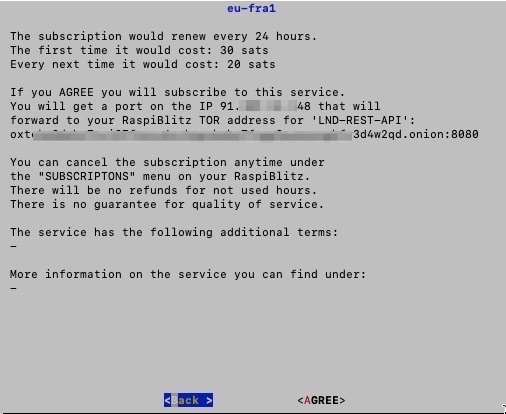
Once again, we are shown a summary of the service we are ordering.
Then we have to confirm the process with our password C for the LND Wallet.
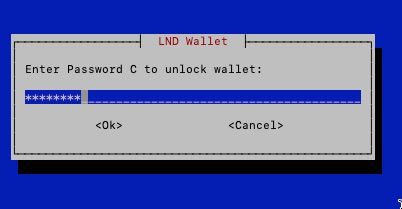
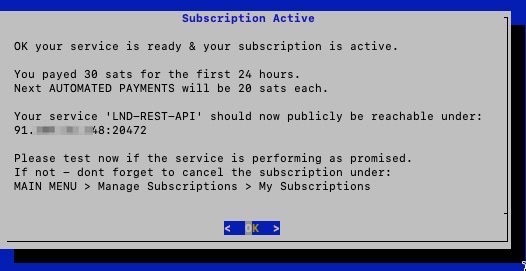
Then the order will be activated.
Now the IP2Tor service must be set up via the Raspiblitz menu and the item “Connect Apps & Show Credentials”.
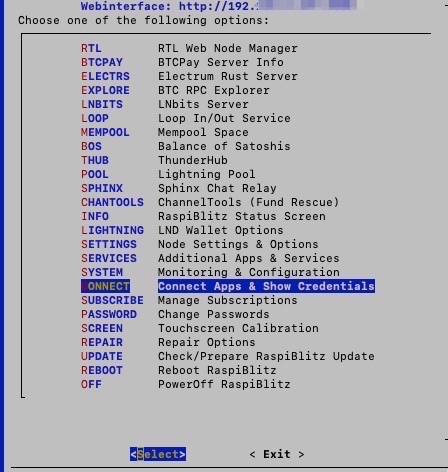
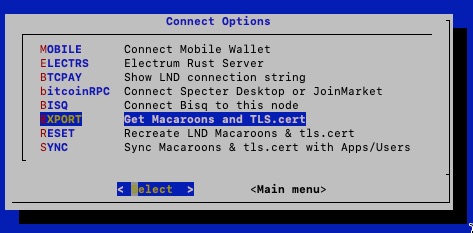
There we get to the following Connect option selection and choose Export to “Get Macaroons and TLS.cert”.
Then we need to specify what we want to export and select BTCPay Connection String.
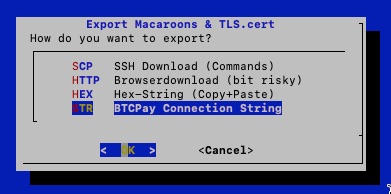

Then we get the BTCPay Connection String displayed:
This BTCPay connection string is needed to be stored at the BTCPay server in the Lightning settings.
Accordingly, we switch to our BTCPay Store and store the BTCPay Connection String in the field “Connection configuration for your custom Lightning Node”.
When we click on Test Connection, the green box will then appear with the confirmation that the connection has been successfully established.
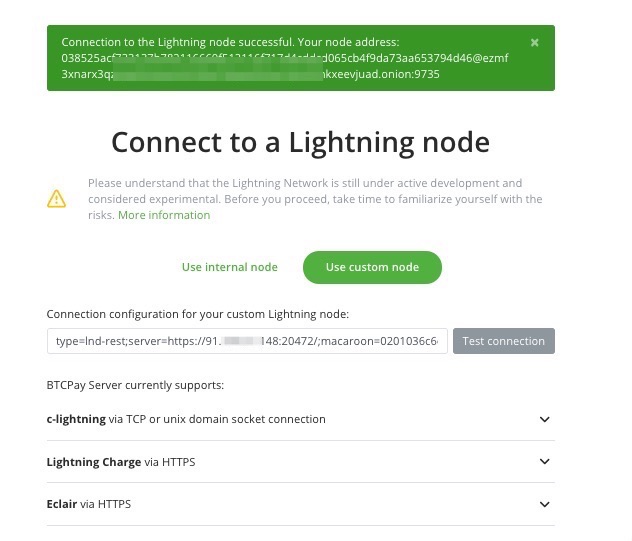
Then we save the settings and can use the external BTCPay server to receive Lightning payments, which are credited directly to our Raspiblitz Lightning Node.

