BTC Paywall is a WordPress plugin that allows you to charge for WordPress content.
The reader gets to a post as usual, the beginning of which can be read normally.
Starting at a point specified by the publisher, there is a pay button. From this point on, the article is protected by a paywall.
After successful payment via Lightning, the BTC paywall is lifted and the reader can enjoy the full article undisturbed.
Payment is made by Bitcoin via the Lightning Network. This means that items with an equivalent value of just a few cents can be billed. The reader does not have to register and can quickly, easily and anonymously release the article. The reader does not have to go through a lengthy registration process or take out a subscription if he wants to read just one article after all.
The WordPress plugin presented here comes from High Level Bitcoin and the credit of the made Lightning payments are credited to the LNbits wallet.
Those who run their website under WordPress can now offer their WordPress content (blog, pages, videos, etc) for a fee with the BTC Paywall.
For this you need besides WordPress:
- BTC Paywall WordPress Plugin von High Level Bitcoin
- Lightning Wallet bei LNbits
BTC Paywall WordPress Plugin
The BTC Paywall WordPress plugin can be downloaded from the Github page https://github.com/supertestnet/btcpaywall. Alternatively, it can be found in the WordPress search and then installed in its own WordPress installation.
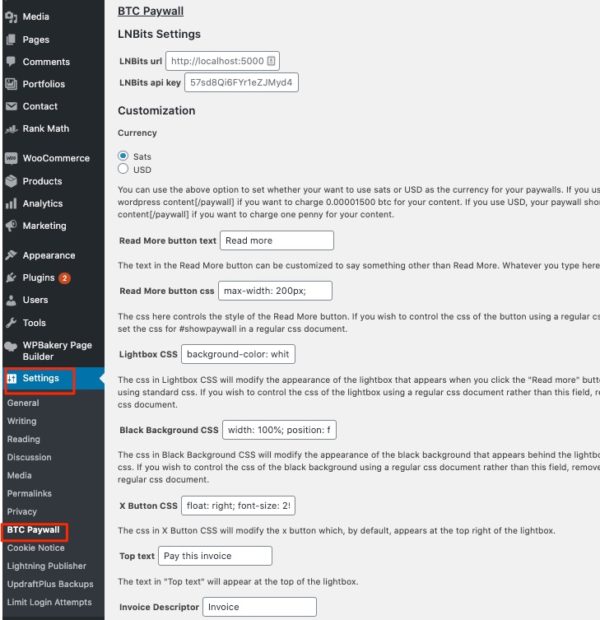
The configuration of the BTC Paywall is done via the WordPress menu under Settings. Here you can find the new subitem BTC Paywall.
When configuring BTC Paywall, it is necessary to specify where the Lightning payments should be credited.
LNbits is used to manage the Lightning credit. LNbits ist ein Lightning Account System.
One has the possibility to set up a Lightning Wallet on the site LNbits.com. Then you use the existing Lightning Account System from LNbits.
But you can also run your own LNbits server. If you have your own Raspi flash running, you can unlock LNbits yourself with a few clicks….
More information about LNbits can be found in the article: LNbits – Lightning Wallet and Account System
Create Lightning Wallet at LNbits
In our example we go to the page of LNbits.com
On the LNbits homepage we think of a name for our wallet and click on “Add a new Wallet”.
We get to the admin page of our LNbits Wallet.
In order to access the backend of our LNbits wallet again at a later time, we have to save the URL or bookmark it.
In the right upper field we get various details about our Lightning Wallet. For the BTC paywall we need the details of Invoice/read key:
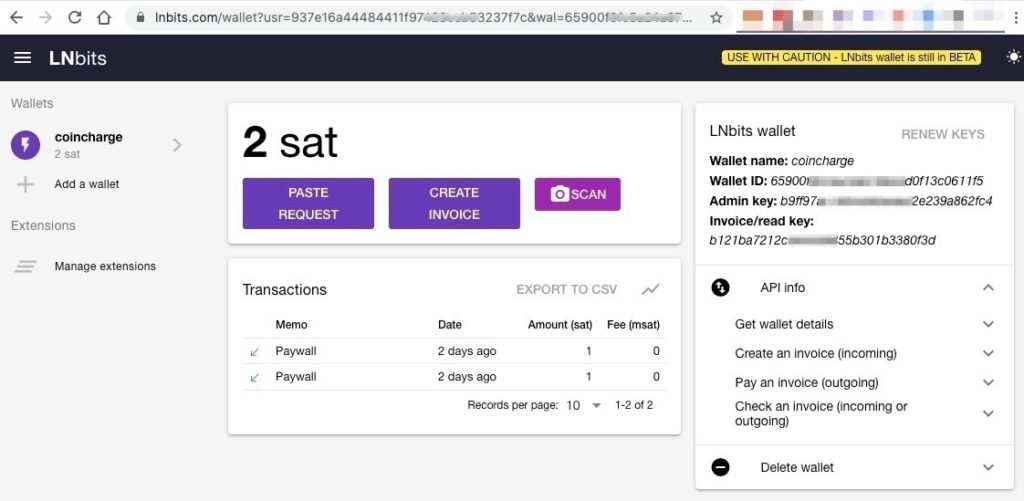
The Invoice/read keyis stored in WordPress. For this we open at WordPress > Settings > BTC Paywall
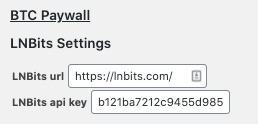
The LNbits url field is used to enter the Internet address of the LNbits server where the LNbits wallet is located. If we run our own LNbits server, then our own URL. In our case we use the server provided by LNbits and enter this url.
In the LNBits api key field we enter the Invoice/read key.
We will not make any other changes to the settings for now. Then we save the settings and will include a paywall in a blog post.
Include BTC paywall in blog post
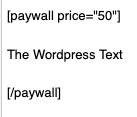
Within the blog post, the adjacent code is inserted at the point from which the post is to be chargeable.
The amount is expressed in satoshi (sats). In our case, the item should cost 50sats.
The end of the paid subscription is completed with the code.
Click on the Read More button below to unlock the text that is behind the BTC paywall.
An overview of other providers of Lightning paywall solutions can be found in the article:Lightning Paywall Provider


Leave a Reply
Your email is safe with us.