
Wallet of Satoshi (Update 2026)
Wallet of Satoshi 2026 Update
How to use the new Wallet of Satoshi
The Wallet of Satoshi has been one of the most widely used Lightning wallets in the world for years – mainly because it makes it so easy to get started with Bitcoin and Lightning payments. But at the beginning of 2026, a lot has changed for users in the EU. The wallet, which was long known as a custodial solution, was converted to a self-custodial variant. This means that you now have complete control over your own Bitcoin.
In this updated article, we take you step by step through the new Wallet of Satoshi. You will learn how to get started with the wallet as a beginner, how to top it up with Bitcoin, receive Lightning payments and pay with it in everyday life. We not only explain the basic functions, but also show you how to use the wallet practically and securely.
A particular focus is on use in brick-and-mortar stores. We show you how you can easily accept Bitcoin and Lightning payments with the point-of-sale function of the Wallet of Satoshi – and how employees can also process payments for you without having access to your entire balance.

Switch to the Wallet of Satoshi website
If you were already using the Wallet of Satoshi before the changeover, you will also find a clear explanation of how to switch from the custodial to the self-custody version in this article. We explain how to transfer your existing balance and what you need to bear in mind to continue using your Lightning address.
Finally, we will show you how to properly secure your Wallet of Satoshi. This will ensure that you always have access to your Bitcoin – even if you lose your smartphone or have to set up the wallet again.
YouTube Video: Accepting Bitcoin and Lightning payments with the Wallet of Satoshi
There is an explanatory video about the article “Accepting Bitcoin and Lightning payments with the Wallet of Satoshi” on the Coincharge YouTube channel in German.
Install Wallet of Satoshi
The Wallet of Satoshi is installed as an app directly on your smartphone. You can find it either via the official website walletofsatoshi.com or via the App Store on iPhone or the Google Play Store on Android. Simply search for “Wallet of Satoshi” there. Make sure that you install the original app, as there are always similar-sounding applications in the Bitcoin environment. In the App Store, the wallet should look exactly like the one shown in this article.
After installation, you start the Wallet of Satoshi for the first time. As soon as you open it, the app will ask you whether you want to create a new wallet or use an existing wallet. As you are using the wallet for the first time in this case, you select the option to create a new wallet. A new Lightning wallet is automatically created for you in the background without any further action.
You do not need to worry about the backup at this point – we will go into this in detail later in the article. First, you will land on the wallet’s start screen, which shows you a balance of 0 sats. This is completely normal, as the wallet has not yet been topped up with Bitcoin.
Wallet of Satoshi Settings

Before we delve deeper into the functions, it is worth taking a quick look at the settings. By default, the display is often set to US dollars. To change this, open the menu at the top right using the three dashes. There you will find the item for currency selection, which is initially set to USD. You can easily switch to euros here with a tap.
The language is also usually automatically set to German. If this is not the case for you, you can change it in the same place. The wallet is now optimally prepared and in the next step we can take care of how to load Bitcoin and receive your first Lightning payments.
Top up wallet or receive payments

At the beginning, your Wallet of Satoshi is still empty. To be able to use it, you must first deposit a few Bitcoin. In everyday life, you will usually work with sats – these are the smallest units of Bitcoin and the usual representation for Lightning payments.
You will find two central buttons at the bottom of the Wallet home screen: Receive and Send. As we want to add funds to the wallet, we first select Receive.
Receive Bitcoin Onchain
After tapping on “Receive”, the wallet will show you a Lightning receive page by default. This is ideal if you want to receive sats from another Lightning wallet. To get started, however, it is also worth taking a look at the onchain variant – i.e. the classic way of receiving Bitcoin directly via the blockchain.
You will find a Bitcoin symbol at the bottom of the view. Tap it to switch from Lightning to Onchain.
Receive Bitcoin onchain from a hardware wallet
Bitcoin basically exists in two worlds: onchain and Lightning. While Bitcoin is usually stored securely onchain for the long term, Lightning is generally used for fast and cheap payments in everyday life. It is precisely this combination that makes the Wallet of Satoshi so practical.
Many of you already own Bitcoin and ideally store it on a self-custody hardware wallet such as BitBox, Ledger or Trezor. You can easily transfer a small amount of Sats from such a hardware wallet to your Wallet of Satoshi to top it up for Lightning payments.

For example, if you want to send Bitcoin from your BitBox to the Wallet of Satoshi, you first connect your BitBox to your computer and open the BitBox app. After unlocking it with your password, you switch to the area where you can send Bitcoin.
You will be asked to enter a destination address. Next to the input field is a small symbol for the QR code scan. If you select this, the BitBox app activates your computer’s camera. If you now hold the QR code from the Wallet of Satoshi in front of the camera, the Bitcoin address is automatically recognized and entered correctly in the field.
This ensures that the address is error-free and the transfer is carried out securely. After sending the transaction, it takes some time – depending on the selected fee – for the Bitcoin onchain to be confirmed. As soon as this has happened, the funds appear in your Wallet of Satoshi and are then also available for Lightning payments.
Receive Bitcoin Lightning
Receive Lightning payments
You can receive Lightning payments in the Wallet of Satoshi via the left button with the lightning symbol. There are several options for receiving payments flexibly – depending on whether the payer and recipient are face-to-face or not and whether the amount should be open or predetermined.
A particularly simple variant is the fixed receiving address, which is displayed to you directly as a QR code. This form is particularly suitable when the payer and payee are face to face. You simply show the QR code on your smartphone, the payer scans it with their Lightning Wallet and can make the payment. In this case, the payer decides for themselves how many Sats they want to send.
If the payer is not directly in front of you, you can also pass on the same payment request digitally. The Wallet of Satoshi allows you to copy this information to the clipboard or forward it using the share function, for example via Messenger or email. Here too, the payer decides on the amount.

Send Bitcoin
Send Bitcoin Lightning
Send Lightning payments
Now that we have seen how payments can be received and an initial Sats balance is in the wallet, the next question is: How do you actually pay yourself with the Wallet of Satoshi?
To send a Lightning payment, tap the Send button on the right-hand side of the home screen. Your smartphone’s camera will open immediately afterwards. This is no coincidence, as Lightning payments are very often triggered via QR codes in practice. The activated camera signals that the wallet is ready to scan a QR code and make a payment.
If someone shows you a QR code in person – for example on their smartphone, at the till in a store or on a till display – you can now simply scan it. Even if a QR code has been sent to you digitally and you see it on another screen, it works in the same way. After scanning, the wallet automatically takes over all the payment information and you only have to confirm the payment.


However, a QR code is not always available. For precisely these cases, the Wallet of Satoshi offers further options for triggering a payment below the camera view.
You can enter a Lightning address manually using the keyboard symbol. For example, if someone gives you an address such as jens@walletofsatoshi.com, you can enter it here and then specify and pay the desired amount in Sats.
The symbol with the two leaves stands for the clipboard. This option is particularly useful if you have received a Lightning Invoice as text. If you copy it beforehand, you can simply paste it here. The wallet automatically recognizes the invoice and prepares the payment accordingly.
However, if you have received an image with a QR code – via Messenger or email, for example – you can select it using the image icon. The wallet reads the QR code from the image and processes it in the same way as if you had scanned it directly with the camera.
This means that the Wallet of Satoshi covers all common ways of sending Lightning payments – whether on site, by message or via a forwarded payment request. In the next section, we take a look at how the wallet can be used in everyday life and especially in stationary retail.
A major advantage of the Wallet of Satoshi can be seen precisely at this point: Using the send function, you can send Bitcoin to practically any recipient without having to worry about whether they want to receive Bitcoin onchain or via Lightning. The wallet automatically recognizes the type of payment request and takes care of the appropriate processing in the background.
For you as a user, this means maximum simplicity. You scan a QR code, enter an address or a Lightning Invoice – and the Wallet of Satoshi does the rest. You don’t have to decide for yourself whether this is a Lightning payment or a classic on-chain transaction.
This is particularly practical if, for example, you realize that too much credit has accumulated in your Wallet of Satoshi. In this case, you can easily transfer the Bitcoin back to your own hardware wallet. To do this, either scan the QR code of your hardware wallet or enter the corresponding Bitcoin address manually. This usually starts with bc1q.
This allows you to use the Wallet of Satoshi specifically as a payment wallet for everyday use, while larger amounts remain securely stored on your hardware wallet. It is precisely this separation of secure storage and ease of use that makes the Wallet of Satoshi so attractive for many users.
Personalized Lightning address
By default, the Wallet of Satoshi provides you with your own Lightning address. This works immediately and reliably, but initially seems rather technical and not very personal. If you want, you can customize this address later – for example with your own name or an easily memorable term.
The way there is via the Receive area. Below the QR code, you will see your currently assigned Lightning address. Right next to it is a small symbol in the shape of a person. If you tap on it, the area where you can adjust the Lightning address opens.


Before Wallet of Satoshi releases a personalized Lightning address, however, a few basic requirements must be met. In this way, the provider ensures that the wallet is actively used and set up correctly. First of all, the wallet must be secured – we will explain exactly how this works in detail in the next section.
Wallet of Satoshi also expects that at least one Lightning payment has been made. It does not matter whether you have sent or received sats yourself. In addition, at least one on-chain transaction must also have taken place, regardless of whether it is a send or receive.
Once these points have been met, you can freely choose and customize your Lightning address. From this moment on, you will receive a much more memorable address that is ideal for passing on – whether in a personal environment, in a business context or simply to receive Lightning payments even more easily.
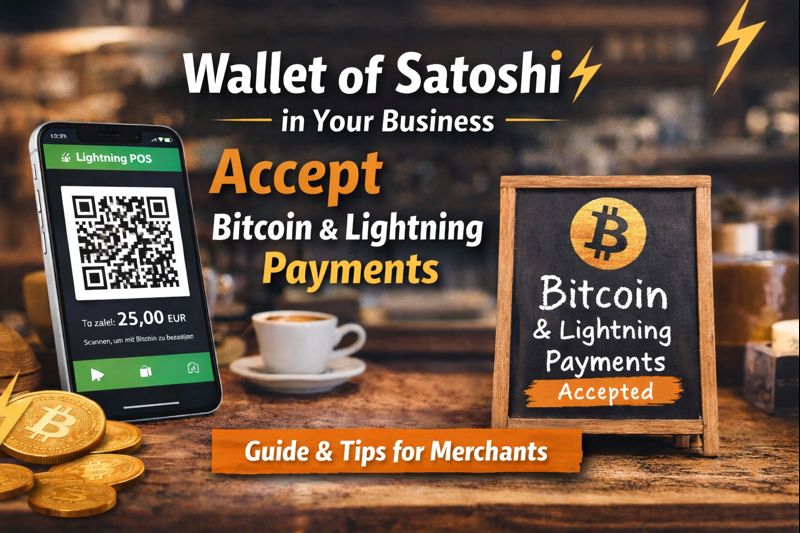
Wallet of Satoshi as a point of sale in the store
Wallet of Satoshi Point of Sale
The Wallet of Satoshi can not only be used for private payments, but is also ideal for accepting Bitcoin and Lightning payments in your own business. The app has an integrated point-of-sale function for this purpose – simply put, a digital cash register.
The settings icon in the top right-hand corner takes you to the checkout area. After opening it, a clear input screen appears, which is reminiscent of a classic cash register keyboard.


Here you enter the invoice amount – either in euros or directly in sats. The wallet takes care of the conversion automatically. You can also enter a note, such as an invoice number, a voucher note or an internal reference.
As soon as the amount is set, a tap on the green field is sufficient. The Wallet of Satoshi then creates a Lightning Invoice, which is displayed to the customer as a QR code. They scan the code with their Lightning Wallet and pay within a few seconds. A simple and direct solution, especially for stores where the owner accepts payments in person.
This form of use is ideal for smaller stores, cafés, market stalls or service providers in particular: a smartphone is all you need to accept Bitcoin and Lightning payments quickly and easily.
Wallet of Satoshi Point of Sale App
But what happens if you are not always in the store yourself and employees are also supposed to accept payments? This is exactly what the Wallet of Satoshi Point of Sale app for employees is for.
This separate POS app is available via the Wallet of Satoshi website https://walletofsatoshi.com/pos or directly in the App Store.
Search there for Wallet of Satoshi POS.


After installation on the employee’s smartphone, they will be asked which wallet the earnings should be credited to. At this point, simply enter the Lightning address of your business Wallet of Satoshi.
From this moment on, all Bitcoin and Lightning payments that the employee receives via their own smartphone flow directly to the holder’s wallet. The employee has no access to the balance and cannot make any payments. This allows Bitcoin payments to be delegated securely – similar to a traditional cash register, but on a Lightning basis.
Wallet of Satoshi thus offers a flexible solution for stationary retail that is suitable for both individual entrepreneurs and teams and does not require any additional hardware.
Backup and securing the Wallet of Satoshi
As the Wallet of Satoshi is now a self-custody wallet, the responsibility for the security of your Bitcoin lies entirely with you. This makes it all the more important to secure your balance correctly so that you can access it again at any time in an emergency.
You can find the backup in the app settings. To do this, open the menu at the top right using the three dashes and select Settings again. A little further down you will find the menu item “Secure your wallet”. This is where the most important step in securing your Bitcoin begins.


After opening it, you will be offered two options for backing up. The first option is a backup via Google Drive. If you use a Google account, you can use it to store your seed – the secret key to your wallet – in encrypted form in your Google Drive. This option is particularly convenient and is ideal for users who prefer a simple and digital backup.
Alternatively, the Wallet of Satoshi offers a manual backup. You will be shown twelve words that you should write down in the correct order and keep safe. These words are the key to your wallet. You can use them to restore your wallet at any time – even if your smartphone is lost, damaged or you no longer have access to the app.
No matter which option you choose: Without this backup, there is no way to recover lost Bitcoin. The backup is therefore not an optional step, but essential.
At the same time, a tried and tested principle applies: you should only hold as much Bitcoin on the Wallet of Satoshi as you need for everyday payments. Larger amounts and long-term savings belong on a secure hardware wallet. Ideally, the Wallet of Satoshi serves as a payment wallet – comparable to cash in your wallet – while your saved Bitcoin remains securely and separately stored.
With this combination of backup and sensible partitioning, you are both flexible in everyday life and on the safe side in the long term.
Switch to self-custody in the EU from 2026
Since the beginning of 2026, Wallet of Satoshi has only been available as a self-custodial wallet in the EU. With this change, Wallet of Satoshi is responding to the increasingly strict regulatory requirements placed on custodial wallet providers in both the US and the European Union.
Providers that store Bitcoin and Lightning on behalf of their users will be obliged to carry out comprehensive KYC processes in future. This means that wallet owners would have to fully identify themselves, and personal data and transaction information could be passed on to other service providers or even authorities when payments are made. For many users, this clearly contradicts the basic principles of Bitcoin – in particular financial self-determination and the protection of privacy.
In order to continue to protect this privacy, Wallet of Satoshi has decided to take the logical step towards personal responsibility and self-custody.
If you already used the Wallet of Satoshi before 2026, you will usually find two wallet variants on your smartphone: the old custodial wallet and the new self-custody version. You can still switch between these two variants. However, the use of the custodial wallet is now severely restricted.
New Lightning Invoices can no longer be created in the custodial version, and it will no longer be possible to receive payments in the foreseeable future. However, your existing balance will remain accessible and you can continue to send Bitcoin from this wallet.
This is exactly what you should do: Your Bitcoin balance should be actively transferred from the custodial wallet to your new Self-Custody Wallet of Satoshi. This step is not automatic. Wallet of Satoshi deliberately does not carry out this transfer for you – the responsibility lies entirely with you. The easiest way to make the move is to send a payment from the custodial wallet to the Lightning address of your self-custody wallet.
If you already have a personalized Lightning address and would like to continue using it with the self-custody wallet, an additional step is required. In this case, you must contact Wallet of Satoshi support. The request should be made from the email address that you originally provided to Wallet of Satoshi. To do this, write to support@walletofsatoshi.com and ask to transfer your existing Lightning address to the new self-custody wallet. Be sure to include the Lightning address of your new wallet so that support can adjust the assignment accordingly.
By switching to self-custody, Wallet of Satoshi is taking a clear step towards more personal responsibility – but also more freedom. Those who consciously make this transition retain full control over their Bitcoin and can continue to use the wallet for lightning payments in everyday life without any complications.
Fees of the Wallet of Satoshi
Wallet of Satoshi – Fees briefly explained
-
Receive Bitcoin onchain:
1.95 % service fee + network fee -
Send Bitcoin onchain:
1.95 % service fee + miner fee -
Receive Lightning:
No wallet fee, possibly minimal routing fees -
Send Lightning:
No wallet fee, routing fees if applicable
Conclusion about Wallet of Satoshi
Summary and conclusion on the Wallet of Satoshi
The Wallet of Satoshi is particularly impressive due to its exceptional user-friendliness. Hardly any other Lightning wallet can be operated so intuitively and is ready to use immediately after installation. Bitcoin and Lightning payments can be received and sent within minutes – without any prior technical knowledge.
The simple handling of Lightning payments is particularly convenient. Users automatically receive their own Lightning address and can even personalize it after using the wallet for a short time. This makes receiving payments as easy as passing on an email address – a great advantage in everyday life and in a business environment.
The Wallet of Satoshi also offers real added value for merchants. With the integrated point-of-sale function, Bitcoin and Lightning payments can be accepted directly in the store – using just your own smartphone. Employees can also accept payments via the separate Wallet of Satoshi POS app without having access to the balance. The proceeds end up directly in the owner’s wallet.
Since 2026, the Wallet of Satoshi has been available in the EU exclusively as a self-custody wallet. This means that the Bitcoin belongs to you, not the provider. At the same time, ease of use is maintained, as Wallet of Satoshi takes care of all the technical complexity in the background. Nevertheless, the tried and tested principle also applies here: Wallet of Satoshi is first and foremost a payment wallet. Larger amounts and long-term savings should continue to be stored on a secure Bitcoin hardware wallet.
The bottom line is that the Wallet of Satoshi is the ideal Lightning wallet for beginners. It works reliably, can be used immediately and significantly lowers the entry barrier to Bitcoin and Lightning payments. Anyone who has gained initial experience with it and wants to delve deeper into the topic of self-custody can easily switch to advanced wallets such as Phoenix or Zeus later on.
However, for beginners – and for everyday Lightning payments – the Wallet of Satoshi is one of the best solutions on the market and a clear recommendation.
Free initial consultation

Would you like to find out more about how you can use the Wallet of Satoshi to accept Bitcoin and Lightning payments in your business?
Then arrange a free, no-obligation initial consultation now and find out how you can integrate Bitcoin payments into your everyday life in a simple, practical and straightforward way.


Leave a Reply
Your email is safe with us.