The Ride the Lightning application, or RTL for short, is a user interface that allows you to control, monitor, and administer activity on your Lightning Node.
Ride the Lightning runs under the Lightning Nodes of LND (Lightning Network Daemon) and c-lightning.
A prerequisite for the operation of Ride the Lightning is a functioning and synchronized Lightning node.
Ride the Lightning is available on the following platforms: RaspiBlitz, Nodl, BTCPayserver, Blockdaemon, myNode and Lux Node.
The following Ride the Lightning description, is done using the BTCPay Server as an example.
Administer Lightning Node with Ride the Lightning (RTL).
About the post, “Administering Lightning Node with Ride the Lightning (RTL).” there is an explanatory video from Coincharge on the YouTube channel of Coincharge in German language.
It is explained:
- How does the Lightning network work?
- Connect Node with Lightning network
- Open channel
- Pay and receive Lightning Invoices
- Lightning Liquidity
BTCPay Server settings for using Ride the Lightning

To use Lightning with BTCPay, you need to run your own BTCPay server and have the appropriate access rights as an admin.
If you run a BTCPay store with a third-party hoster or with Coincharge, the possibility to accept Lightning payments is not available.
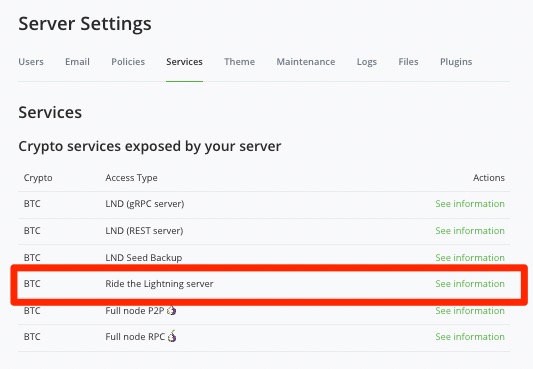
As an operator of your own BTCPay server, you can access the Service subcategory within the Server Settings setting. There you will find the menu item: Ride the Lightning Server.
Nachdem Du auf See Information geklickt hast, gelangst Du auf die folgende Seite:
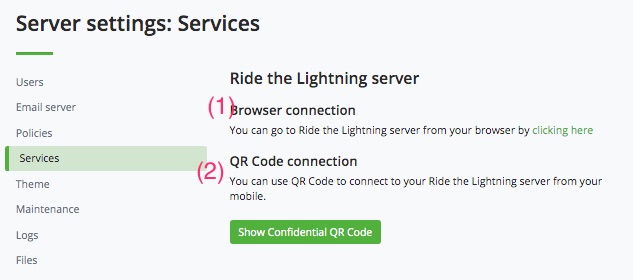
Ride the Lightning Server
You have the option to open the application via your browser (19) or by scanning the QR code (2) via your smartphone.
A normal QR code reader can be used to scan the QR code. A page will then open that looks like this:
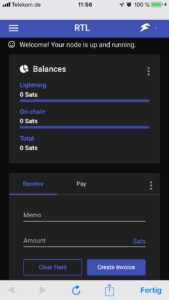
If the page is bookmarked, the page can be revisited at any time and you can view the balance of your Lightning Nodes at any time.
Clicking on the Browser Connection link will open the RTL Dashboard.
Ride the Lightning Dashboard
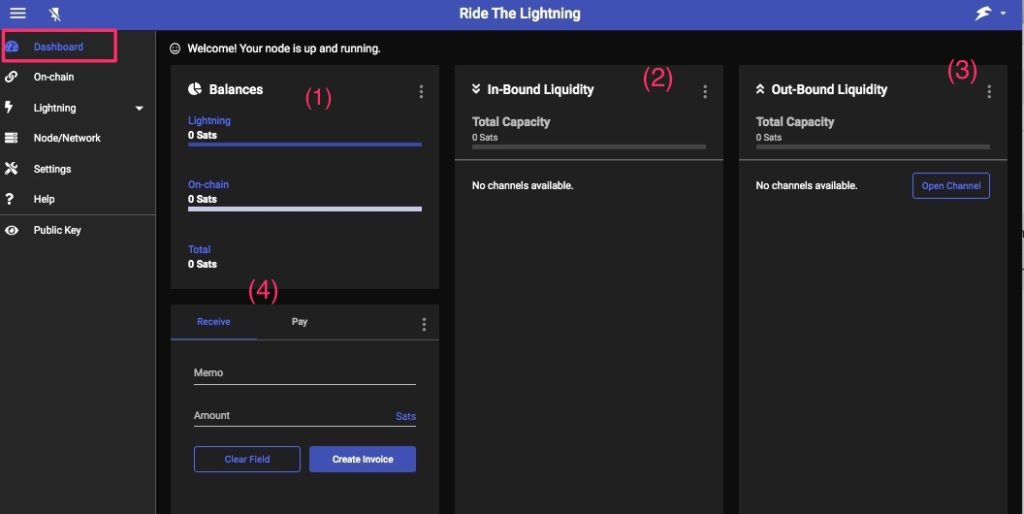
On the Dashboard page you can see your balance under Balances (1). A distinction is made between lightning credit and on-chain credit.
On-chain credit refers to the credit that has been recorded on the blockchain (i.e., on-chain). The on-chain balance is the Bitcoin balance and the off-chain balance is the Lightning balance.
Liquidity (liguidity) is a key point in Lightning.
In order to send and receive Lightning payments, you must have funds (liquidity).
Your Lightning Node will later have a connection to another Node. You must have a credit on the opposite side of this neighboring node to receive payments from there. That sounds bizarre at first. Why should you have credit with the neighboring node when you should be getting money.
Mentally, the Lightning network is a huge accounting system, where each Lightning payment is offset against the respective credit balance.
To participate, you must have appropriate in-bound and out-bound liquidity.
The respective liquidity is displayed accordingly at point (2) or (3). How to get the required liquidity is explained in the article Lightning Liquidity.
In item (4) you can receive Lightning payments (Receive) or request payments yourself (Pay).
When receiving and sending Lightning payments, you have to rethink things a bit again.
In order to receive payments itself, the payee must create an invoice (Invoice) in advance. This invoice (or request for payment) is sent to the payer.
The payer takes this invoice as a basis to then make the payment. All relevant information (amount, recipient, purpose of use) is part of the invoice / payment request.
You cannot (theoretically) receive payments yourself without having created an invoice yourself first.
With KeySend there is a possibility, which is however rather suitable for special use cases. Here you can find more information about KeySend payments without Lightning invoice.
At this point, we continue to consider the case where, prior to a payment, the payee creates a Lightning Invoice that embeds all relevant payment information for payment processing.
On-Chain / Bitcoin
In the On-Chain menu item, the Bitcoin balance is managed.
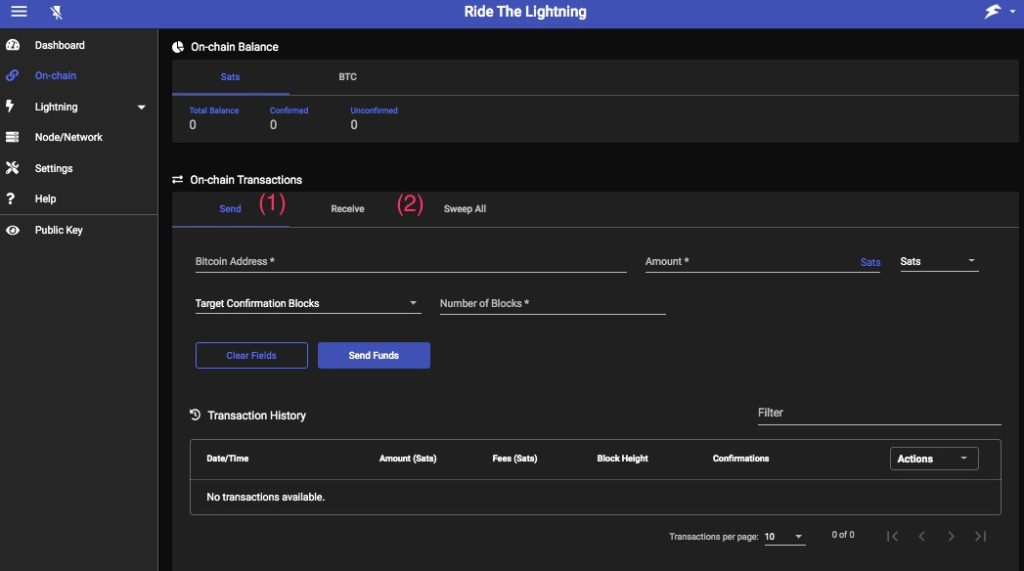
Under the menu item Send (1) you can enter a Bitcoin address to which the Bitcoin should be sent. Under Receive (2) you can generate a Bitcoin address to which you can have Bitcoin sent.
You have the choice of Bech32 (P2WKH) addresses starting with bc1 or P2SH addresses starting with a 3.
Switch to bright day mode for better display.
In order to use Ride the Lightning, it is necessary to make a Bitcoin deposit (on-chain) as a first step.
We go to the “on-chain” side of Ride the Lightning. There we go to the Receive section and arrange a Bitcoin address to which we can make the deposit.
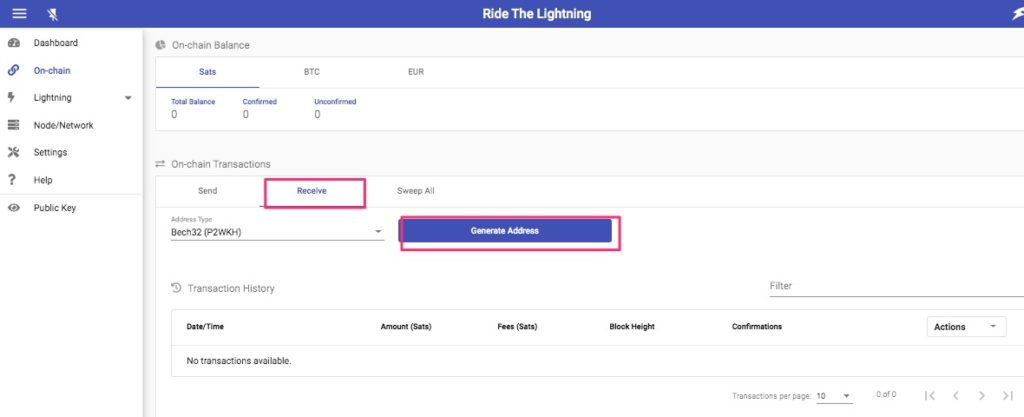
To this Bitcoin address we send some credit. In our case, 1 million Satoshi (0.01 BTC) was sent.
Now we have to wait for bitcoin to be confirmed by the blockchain.
Under the On-Chain menu item, the deposited 1,000,000 sats (abbreviation for Satoshi) are displayed. By clicking on BTC or EUR, the corresponding equivalent value will be displayed.
The FIAT currency that is displayed at this point can be defined under Settings. The conversion rate is based on the current rate from Blockcain.info. We have opted for the euro here.
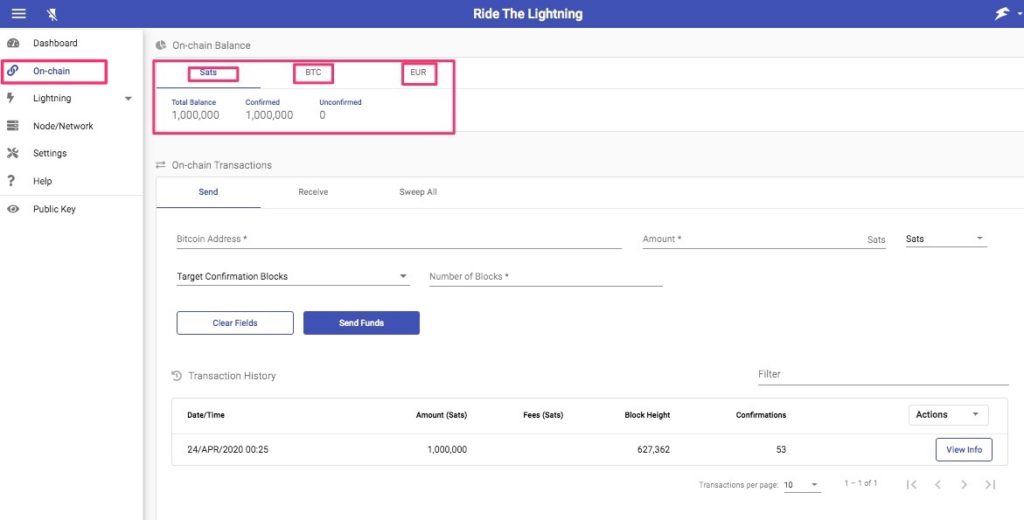
Now we have 1 million satoshi at our disposal. We can now use this balance for Bitcoin (on-chain) and Lightning payments (off-chain).
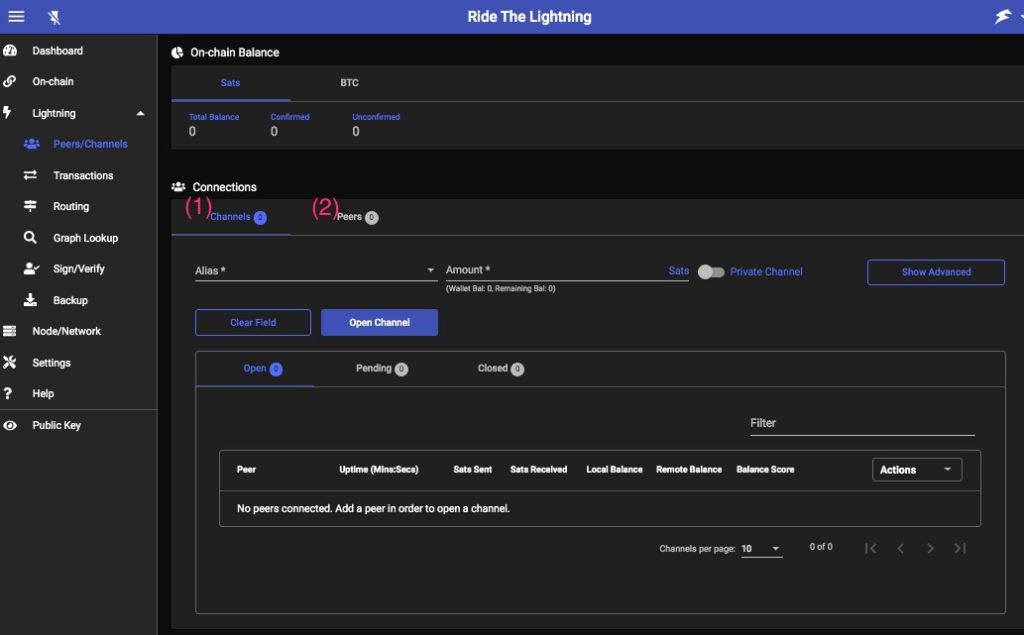
The next step is to connect to another peer (Lightning Node) and open a channel to that Lightning Node.
If you want to connect to another peer, you need the public key (pubkey) or the host address of this peer.
The complete address has the format: pubkey@ip:port
You can choose a peer you would like to connect with on the 1ml.com site.
You can also connect to Coincharge’s Lightning Node.
The public key of Coincharge is: 0318ac9faa9629e7da08819bc8fe0dd2ae3044d69b1b2283a63479acffeb968483
If it does not work with the public key alone, take the node ID (Node Uri) from pubkey@ip:port of Coincharge: 0318ac9faa9629e7da08819bc8fe0dd2ae3044d69b1b2283a63479acffeb968483@172.81.178.22:9735
To connect to the Coincharge peer, open the page under Lightning > Peer/Channels and select the Peers section there:
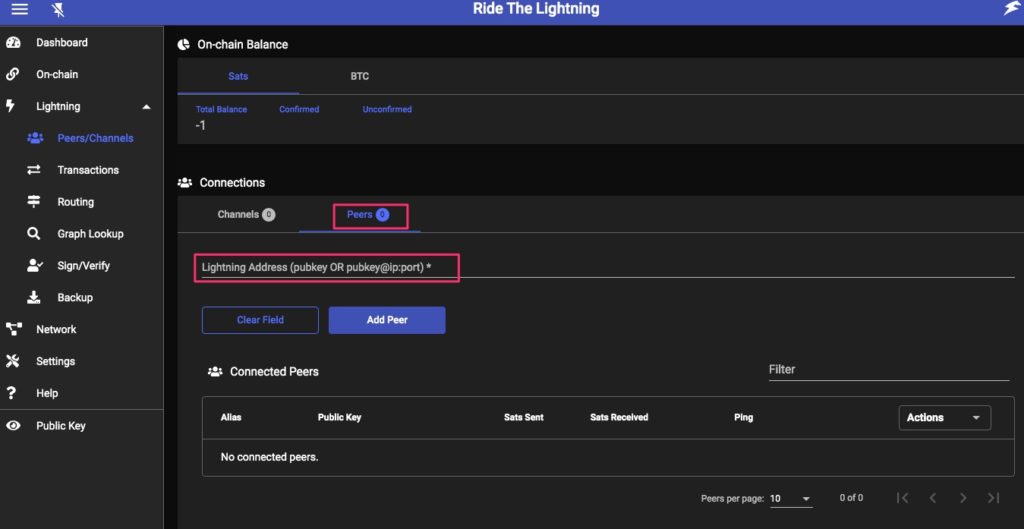
There you enter the pubkey or pubkey@ip:port of Coincharge.
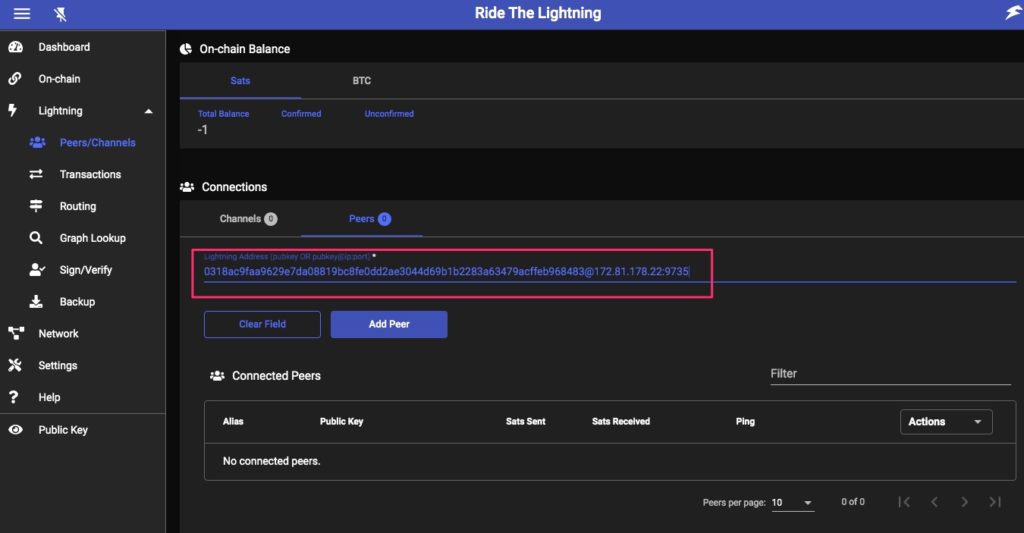
Once you have clicked on Add Peer, the following window will open:
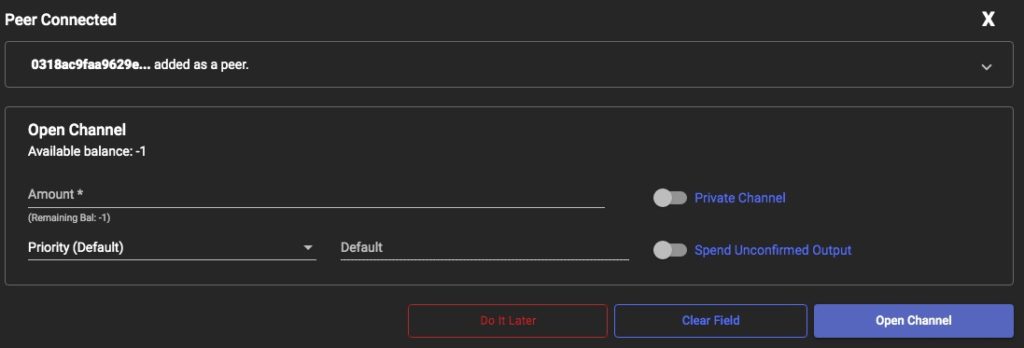
Now there would be a possibility that in addition to linking to the Coincharge peer, a channel would also be opened.
If bitcoin has been deposited to the Lightning Node in advance, you will have the necessary funds to charge the channel.
After all, we had already deposited 1 million satoshi and we can use 100,000 satoshi (0.001 BTC) of it.
If you haven’t deposited any bitcoin (via on-chain) to your own Lightning Node yet, do it now. Wait for the bitcoin to be confirmed by the blockchain. Only then does it make sense to continue at this point.
To connect to a Lightning Node, the first step is to connect to the peer. Then you open a channel and provide liquidity from your Bitcoin (on-chain) balance.
For example, if you provided 100,000 sats in the channel to Coincharge, it will look like this:
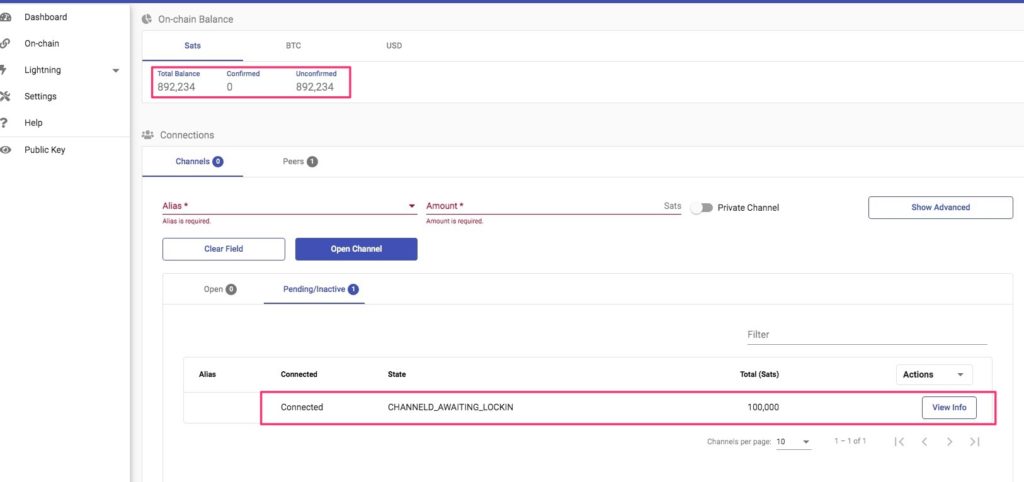
Channeld Awaiting Lockin
The channel is now set up, but still needs to be recorded on the blockchain. as long as the channel has the status Channeld_Awaiting_lockin.
The channel capacity is therefore 100,000 sats. The amount is not spent or gone, but blocked or locked. However, from our original 1,000,000 sats (=0.01 BTC), the Total Balance is only 892,234 sats. So that’s 107,766 sats down.
Of these, 100,000 sats are tied up in the channel to Coincharge. The amount is quasi inbound liquidity for the counterparty.
But where have the remaining 7,766 sats gone? The opening and closing of a channel are each written on the blockchain. The opening and closing of a channel are each written on the blockchain.
The 7,766 sats is the cost of channel opening on the blockchain. An amount was also reserved to pay for the future closure of the channel.
In detail, it looks like this:
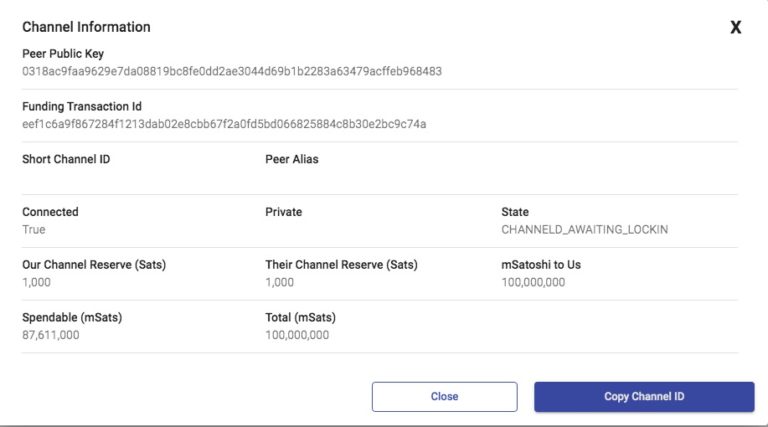
The other peer also displays the request and the channel opening. Your channel opening would then look like this at Coincharge:
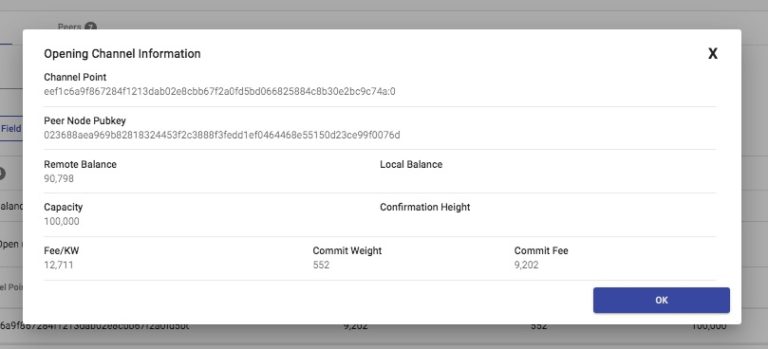
After clicking on the detail view it looks like this:
Channeld Normal
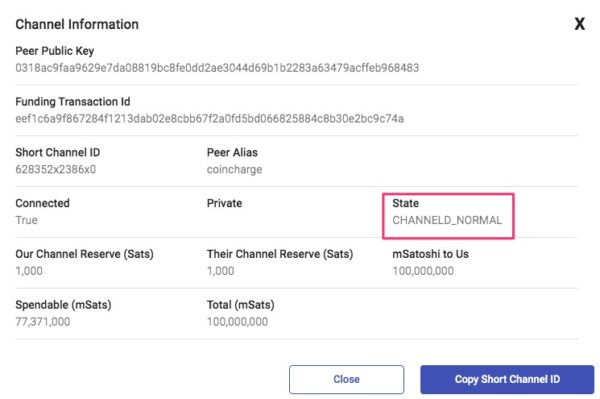
When the channel opening is recorded on the blockchain, the channel status changes to Channeld Normal. This process takes some time, depending on how quickly the block has been confirmed by the blockchain.
As a rule, three confirmations are required before the status changes from Pending to Open. You can query the status using the Channel Point ID. View the channel information. There is an indication Channel Point. There is an indication Channel Point.
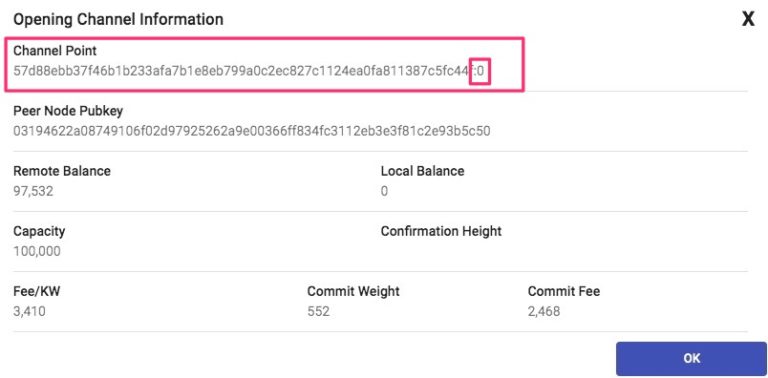
You can enter this information in the search field at the top right of https://mempool.space/to find out whether the transaction has already been processed.
The channel alias then contains the name of the other peer. In this case the pair alias is Coincharge. The Total Amount is given in MilliSatoshi (=mSats).
Once the block is confirmed, the channel information looks something like this in detail:
If the channel opening has been confirmed by the blockchain, the status at the other peer will also change. For the other peer (in our example at Coincharge), it is displayed as follows.
Node URI
In order for other peers to be able to establish a channel to your own node, your node URI or your node pubkey is required.

You can find this information in the left menu under the item Public Key. You can give this information to anyone who needs to connect with you.
In the future, other peers will connect and channel to you as well. Accordingly, it would appear for you.
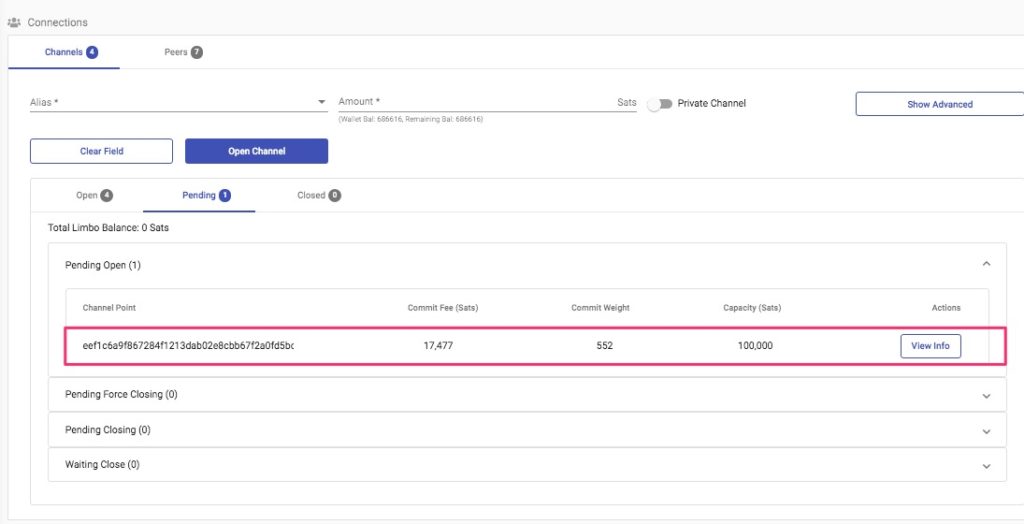
To accept this channel opening and provide it with liquidity as well, proceed as follows.
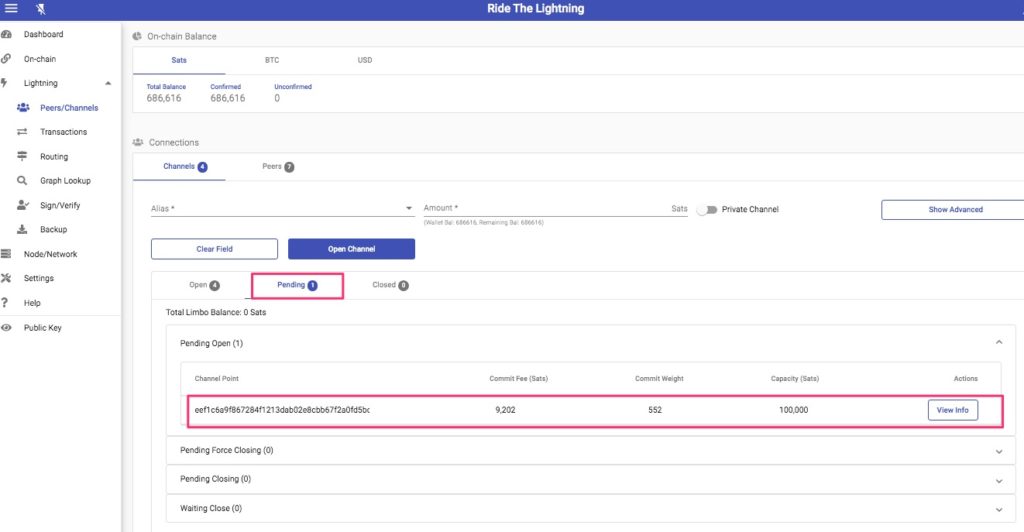
At Open Channel you see the pending channels listed. If you click on the detailed information of this pending channel, you will see this information:
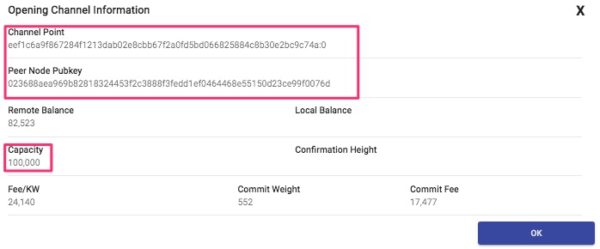
You will get the information about the channel point, which starts here with eef1.
Also the public key of the Lightning Node that wants to connect to you. The peer node pubkey here starts with 0233688a and the capacity is 100,000. You can see that the other side has put 100,000 sats into the channel.
You switch from the channel view to the peers view and find the channel in the listing either by alias or by public key. If you don’t already know the alias, look for the public key, which in our example must start with 0233688a.
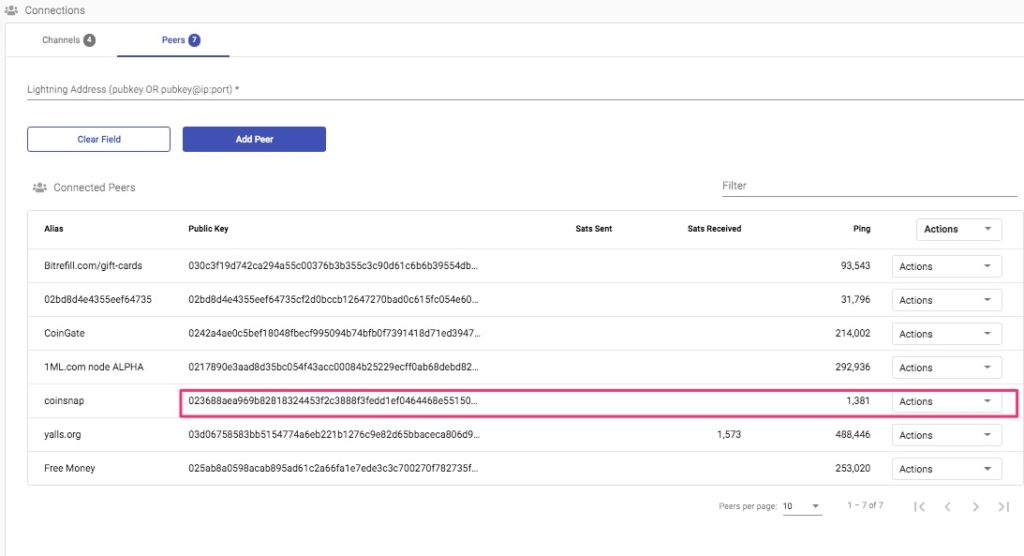
Lightning liquidity received from Coincharge
We have written a separate article for the topic of lightning liquidity: “Lightning Liquidity”.
Here you will find all the relevant information and sources on how to get Lightning Liquidity yourself.
There is also the option to run a shared channel with the Coincharge Node.
To do this, you open a channel with a capacity of 2 million sats with Coincharge. You will then have a balance of 2 million sats on your side (Local Balance) and 0 sats on the other side (Remote Balance).
If you would close the channel now, you would get the sats credited to your Bitcoin On-Chan wallet again. The sats are not gone, but only “blocked”.
But now the channel is to be balanced. For this purpose, 1 million sats are transferred from the local balance to the remote balance. This is done by paying a Lightning invoice.
You will then receive a Lightning bill from Coincharge for that amount, which you pay. Thus, 1 million sats are now moving to the other side.
The Lightning invoice amount will then be refunded to you by Coincharge. They will be sent back to your onchain address then.
Thus, from the original 2 million sats, only 1 million sats are now “blocked”. If you would close the channel now, you would have restored the original state.
If you want to open a joint channel with Coincharge, you can find the exact procedure on the page: Shared Lightning Channel
Lightning > Transactions
After the connection within the Lightning network has been established via the menu item Peers / Channels, we turn our attention to the sending and receiving of Lightning payments in Lightning Transactions.
The Transactions section is divided into Payments (sending Lightning payments) and Invoices (receiving Lightning payments).
In addition, RTL provides the Query Routes item to check how its own node is connected to the node with which a payment is to be processed.
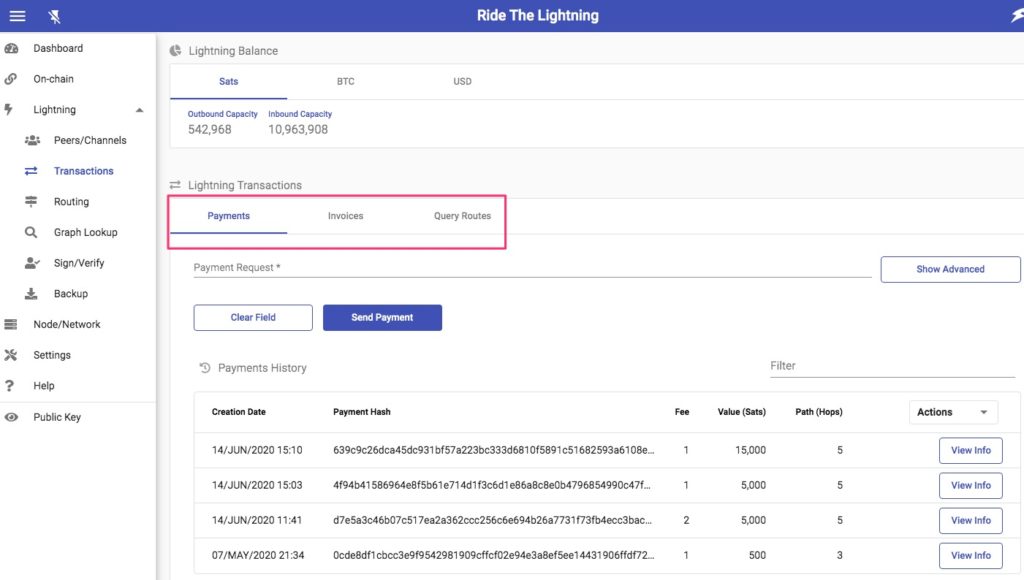
Lightning Payments
Lightning payments are executed via the Payments item. In order to make a Lightning payment, you need a Lightning Invoice from the payment recipient.
We would like to send some Satoshi to one of our Mobile Lightning Wallets. To do this, we create an invoice on the Blue Wallet in the amount of 10,000 Satoshi.
A Lightning invoice starts with lnbcand looks like this, for example:
lnbc100u1p0wwthhpp5prxgz7fyvwxssv……………sfcp0xdvuv
We enter this information in the Payment Request field. We then get the reason for payment and the amount of the invoice displayed below the input. Clicking on View Advanced we get the possibility to set the fees that we are already paying. We leave the setting at No Fee Limits.
The fees depend on how far you are from the bill recipient’s peer/node. This is because each intermediate peer receives a satoshi for forwarding. The Query Routes function allows you to view the different routes and determine the optimal route. The First Outgoing Channel selection allows you to specify the channel through which the payment will be sent.
This optimization potential is available. But our focus is that our payment arrives and we do not yet have so many connections and therefore options, let’s leave it to a secure payment and ignore the amount of fees. These are in the millicent range and are therefore negligible.

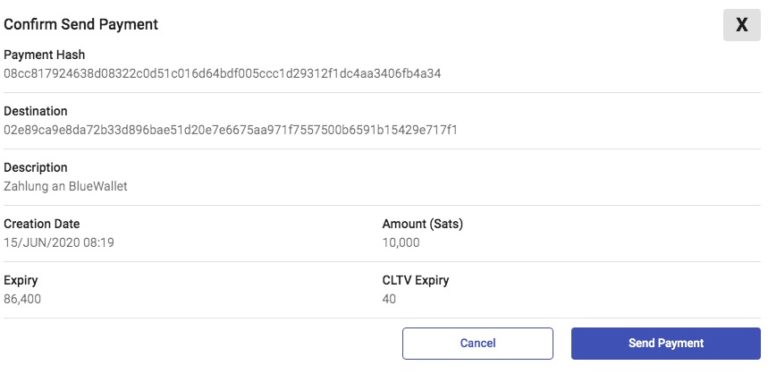
We click on Send Payment and get a detailed view of our Lightning payment again before we finally confirm the Lightning payment.
Lightning Invoices
To receive Lightning payments, the Lightning Invoices function is used. As the payee, an invoice must be created, specifying a purpose and the amount.
The corresponding invoice is then sent to the payer, who makes the Lightning payment with this information.
In the Memo field we enter the purpose of use. In the Amount field enter the amount in Satoshi. In our example 10 000 Satoshi.
We still have the option to specify how long this invoice is valid. Until when the must be paid before the bill expires.

We click on Create Invoice and get the following view:
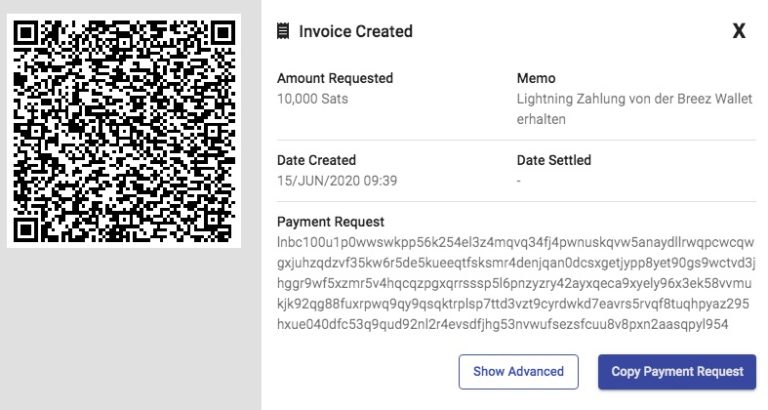
We now have the option to scan the QR code with a Mobile Lightning Wallet or copy the invoice text that starts with lnbc.
To do this, we then click Copy Payment Request and forward the string to the payer.
If the payment has been made, then we see it in the listing of all payments. The payments marked with a green dot have been successful. The transactions with a yellow dot have not been executed yet.
Ride the Lightning Settings
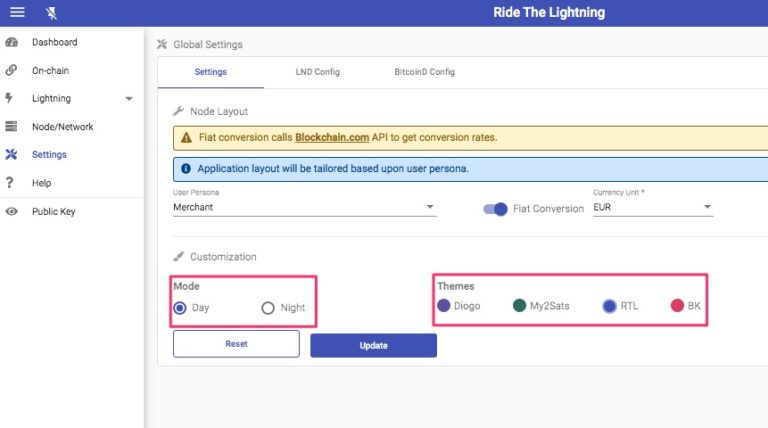
In the Settings section, the settings of the dashboard can be customized. Instead of the default dark night mode (Mode), it is possible to switch to the bright day mode.
The colors can be customized under Themes.
Public Key
In the menu item Public Key you get the information about your own Public Key for your Lightning Node. This public key can be communicated to other Lightning Nodes to open a channel to that node.
If you want to know what information the public knows about this Lightning Node, go to 1ml.com and enter public key as search.
The Lightning Node of Coincharge has the address:
0318ac9faa9629e7da08819bc8fe0dd2ae3044d69b1b2283a63479acffeb968483
You can read all information about this Lightning Node here:
https://1ml.com/node/0318ac9faa9629e7da08819bc8fe0dd2ae3044d69b1b2283a63479acffeb968483
You can find more products and services from Coincharge in the Coincharge Shop




Leave a Reply
Your email is safe with us.